Appvibe Documentation
Welcome to the Appvibe Documentation.
- Figma Integration for monday.com
- Slack Integration for monday.com
- Reports & Charts Integration for monday.com
- HubSpot Integration for monday.com
- Google Sheets Integration for monday.com
- Google Slides for monday.com
- Canva Integration for monday.com
- Google Calendar Integration for monday.com
- Google Forms Integration for monday.com
- Using the apps in incognito window
- Test Management for monday.com
- Sync Items and Boards for monday.com
- Figma Integration for Jira
- Miro Integration for Jira
- Test Chapter
- Appvibe Documentation
- Slack Integration for Jira
- Canva Integration for Jira
Figma Integration for monday.com
Figma Integration for monday.com user guide
Introduction
With this Figma - monday.com integration you will be able to see the live updates of your Figma projects inside monday.com.
Check all the options for this plugin below.
Getting Started
Once you installed the app, you will need to complete 3 easy steps to configure it.
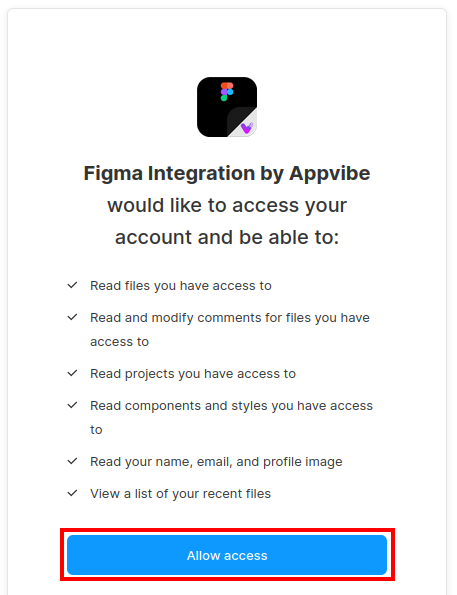
1. First, follow the link on the first card.
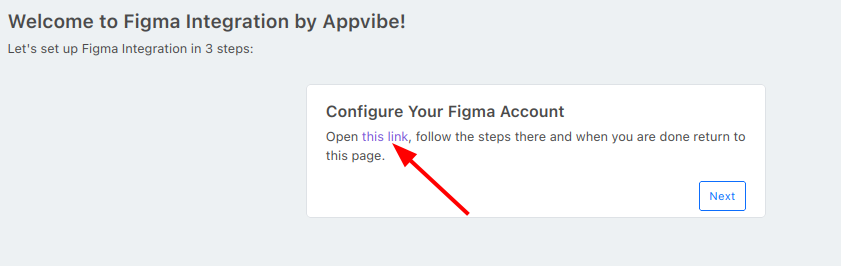
2. This will take you to your Figma account. Allow access to the application, then return to the previous page.
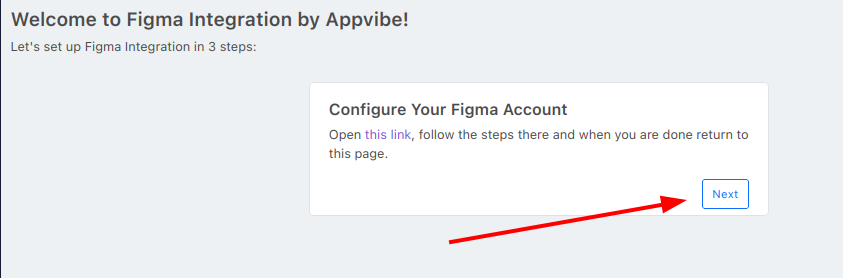
3. After you allowed access to your Figma account, click "Next". Review the instructions, click next again, and then click "Done".
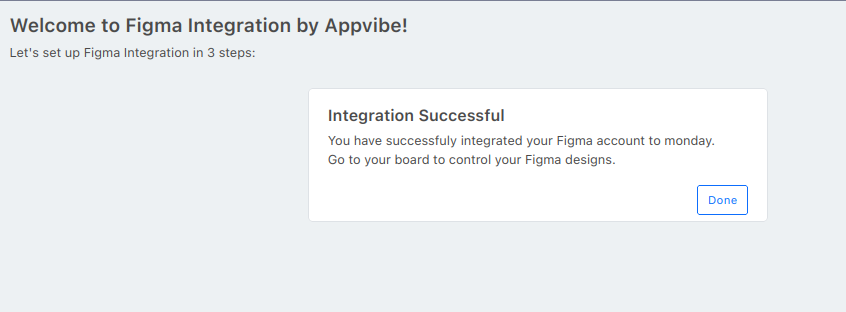
The Figma Integration app is now ready to be used.
Adding Figma Designs
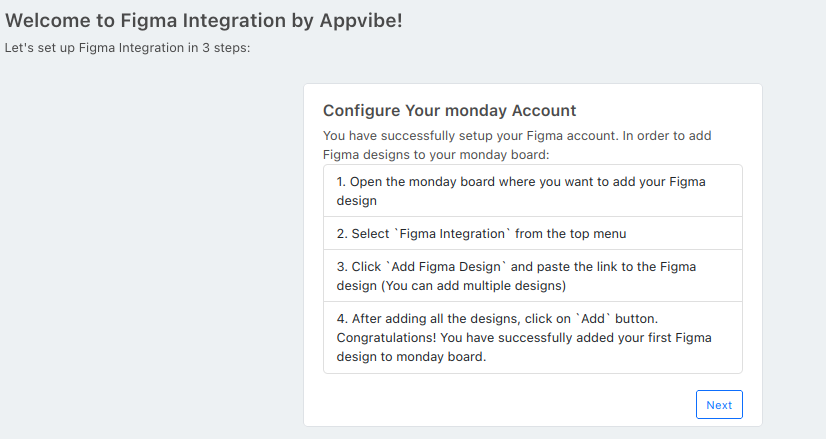
You can review the steps of adding a Figma design on the last page of the setup process:
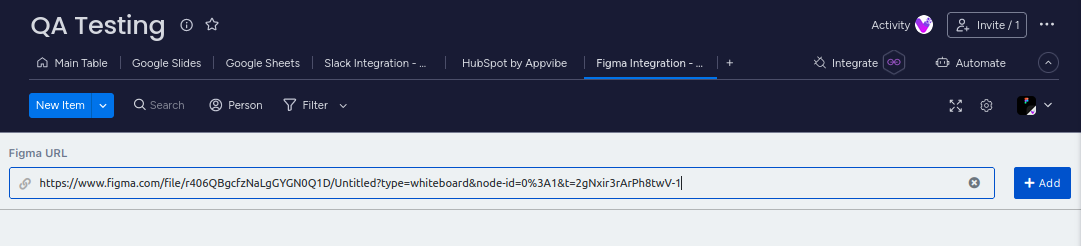
To add a Figma design, follow these steps:
- Open the monday board where you want to add your Figma design.
- Select "Figma Integration" from the top menu
- Click "Add Figma Design" and paste the link to the Figma design. (You can add multiple designs)
- After adding all the designs, click on "Add" button.
If you want to add more Figma attachments, use the "Add Figma Design" option.

Now you can jump into your Figma designs whenever you want, see the progress, or comment or share this with your team.
If you need any help with our app, or if you have any suggestions for us to make it better, please get in touch with our support team, from the Support tab of the app page. We will be more than happy to help.
Release Notes
2023-08-10
- Corrected spelling and typos on the configuration page
2023-05-17
- Initial release
Slack Integration for monday.com
Slack Integration for monday.com
The Slack integration for monday.com provides communication between your monday.com workspace and Slack. Any change or update within monday can be configured to notify one or multiple Slack channels. The Slack Jira Integration app allows you to connect these two services and make your distributed work environment more productive, effective, and rewarding.
Easy and Quick App Setup
These straightforward actions will deliver the add-on to your monday.com instance just in a few clicks.
Setting up the Slack integration
-
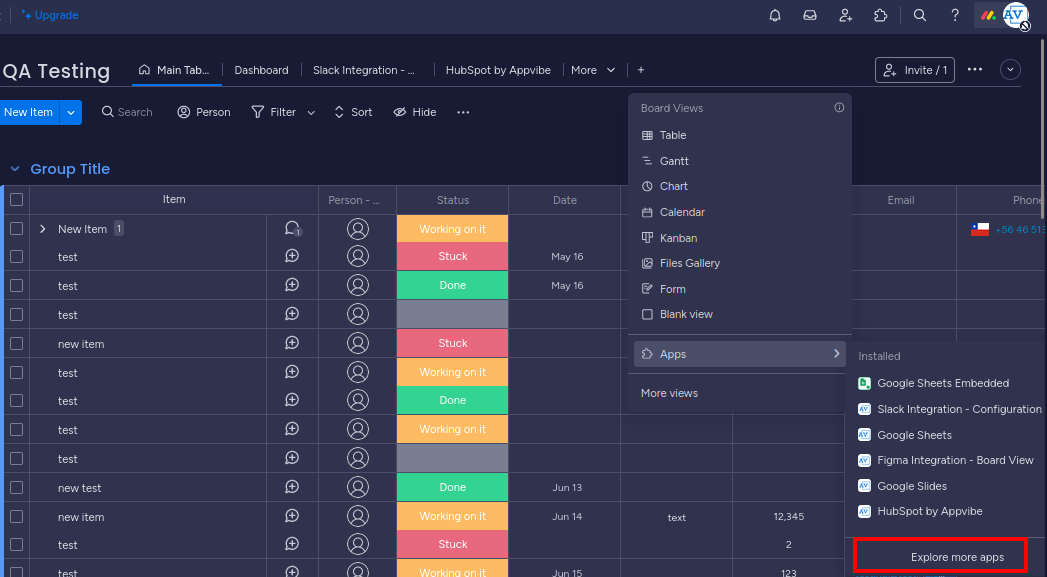
After installing the app, add it to your board by clicking the plus icon, then selecting “Apps” > "Explore more apps"

-
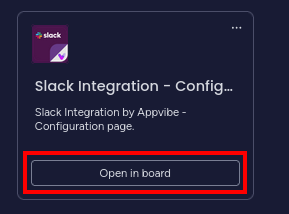
Here, find Slack Integration - Configuration and click “Open in board”.

-
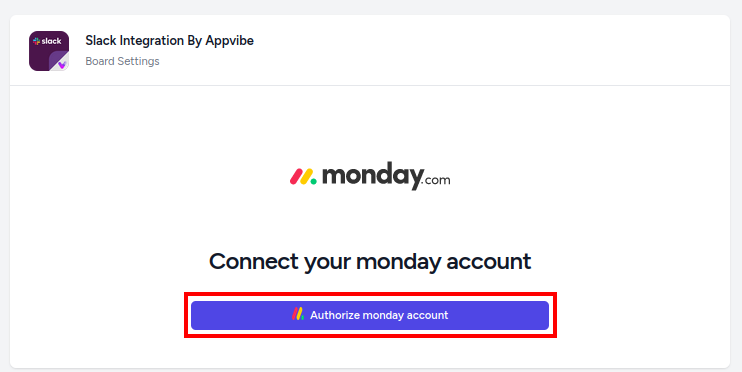
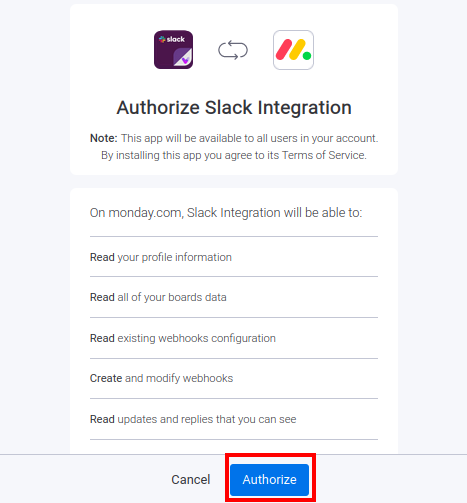
On the configuration page first, you need to click on the button to authenticate your monday account.

- Follow the instructions on screen to log into your monday account and authorize the app.

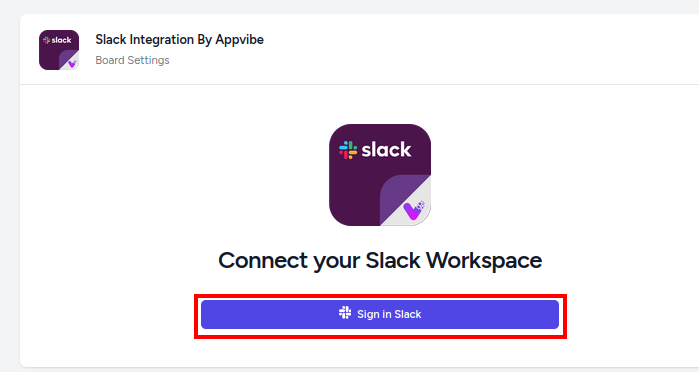
- Next, you need to log into your Slack account and authorize access to your workspace. After clicking “Sign in Slack”, follow the instructions on the pop-up window.

Your account is now connected
Setting up notifications
-
To set up notifications, select the events you want to be notified of.
-
Next, select the Slack channel from the dropdown where you want to get the notifications.
-
Finally, click on “Save”. Now you have set up your notifications successfully.


To change the connected Slack workspace. you can access the settings menu by clicking the gear icon in the corner.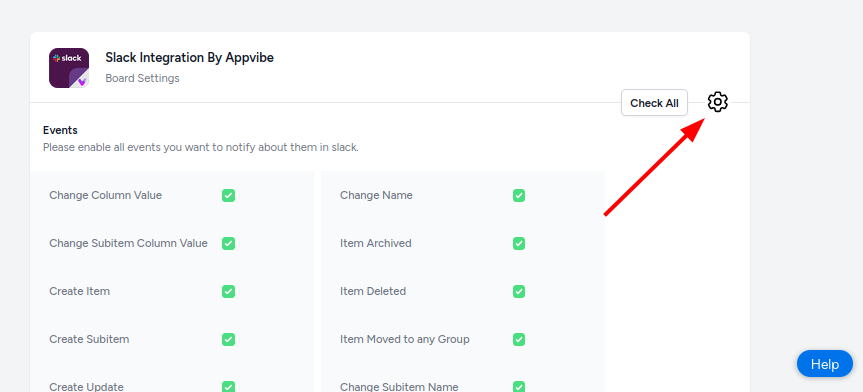
Frequently Asked Questions
When I click on the "Authorize monday.com account" button, nothing happens. What should I do?
If you are not seeing the pop-up window, please make sure you have enabled third-party cookies in your browser. Next to the URL, click on the eye icon:
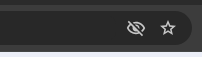
If third-party cookies are blocked, it would look like this:
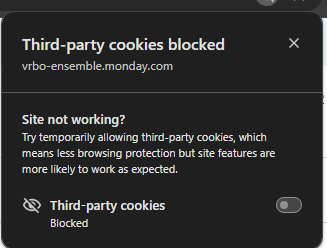
Please make sure to toggle the third-party cookies setting to "enabled" then refresh the page and try again.
Please note that in other browsers you might find this setting in a different place.
Reports & Charts Integration for monday.com
Reports & Charts Integration for monday.com
Get this app to add reports and charts to your monday.com dashboards and display statistics of your boards.
Once it's installed, you can start using the app right away from your Dashboards with a simple configuration.
Adding the app to your Dashboard
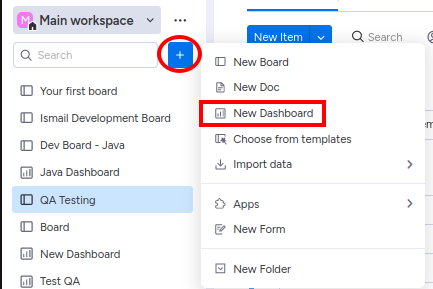
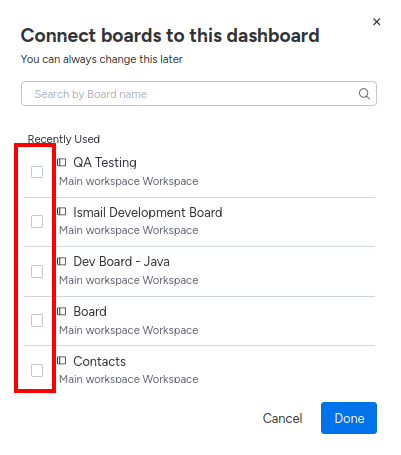
1. As a first step, if you haven’t already, create a Dashboard in your monday workspace:
2. Select one or multiple boards and click "Done".
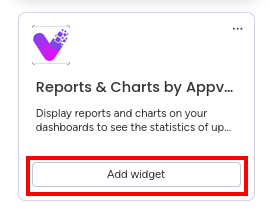
3. On the Dashboard, click “Add widget” and choose “Apps” from the menu:

3. Under “Installed Apps” find Reports & Charts by Appvibe” and click “Add widget”
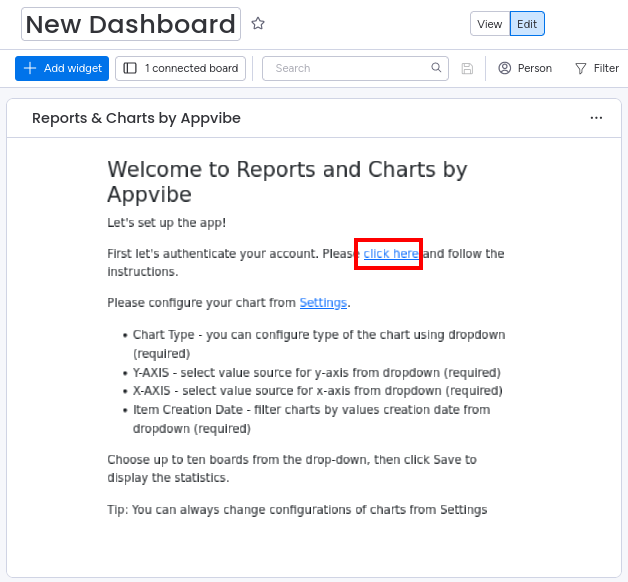
4. With this, you have successfully added the app to your Dashboard
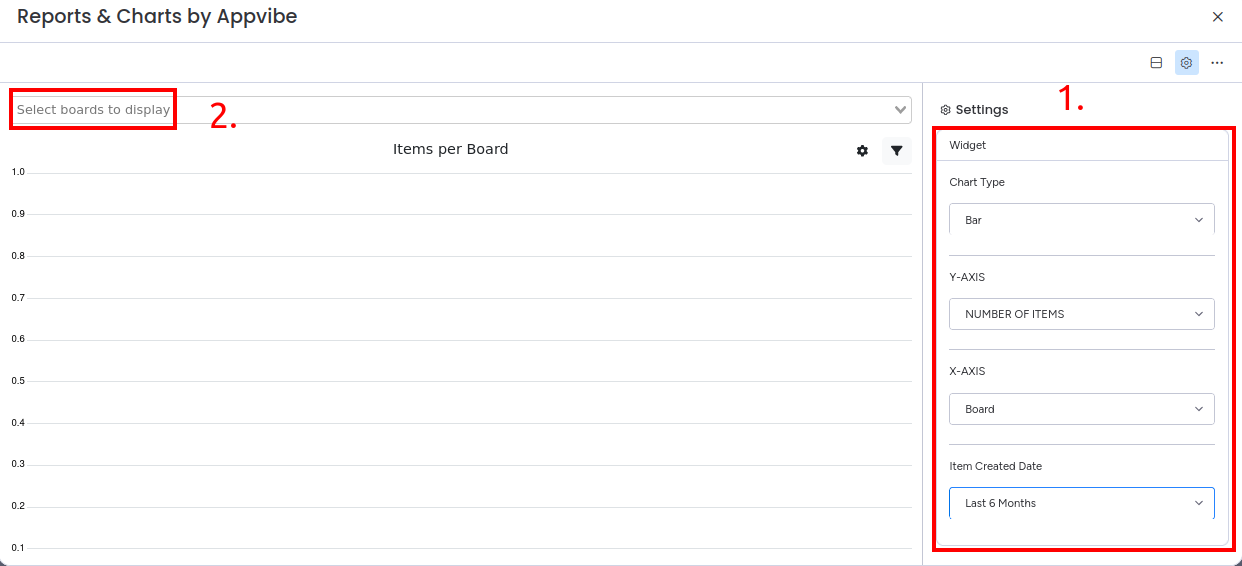
Customizing the Reports & Charts
-
First, you need to authorize your account to start using the app. Click on the first link and follow the instructions.
-
After this, click on “Settings” to set up your report.

-
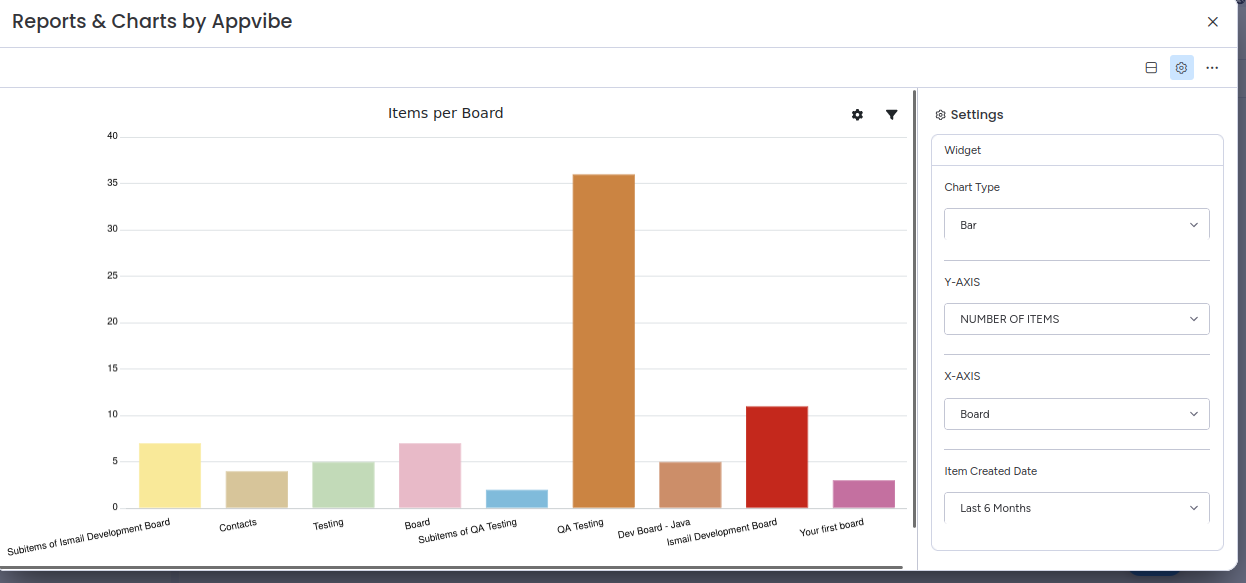
Here, first fill out the “Chart Type”, “Y-Axis”, “X-Axis”, and “Item Created Date” for your desired report. You need to do this first, then you will be able to select the boards.

-
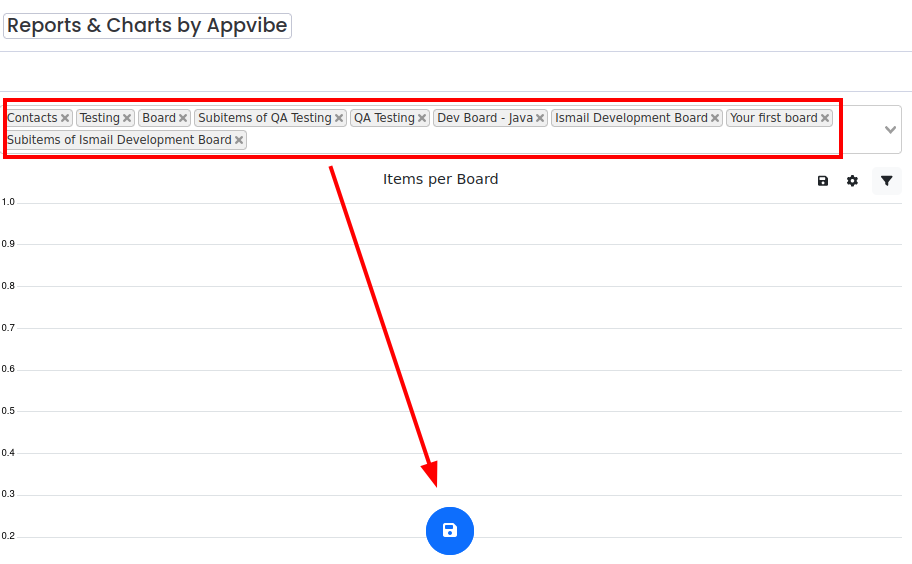
After this, select up to ten boards to display from the top drop-down.
-
Finally, click the save button on the top or at the bottom to finalize the report.

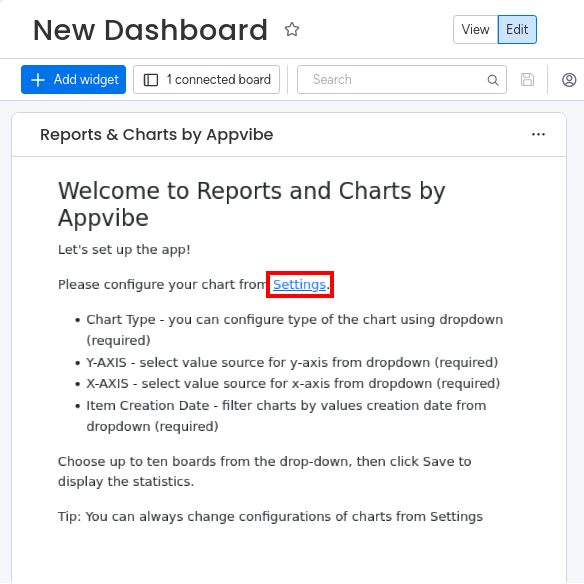

You can open the Settings page from the three vertical dots as well. With this feature, you can easily change the report at any time.
If you need any help with our app, or if you have any suggestions for us to make it better, please get in touch with our support team. We will be more than happy to help.
Release Notes
2023-04-07
-
Initial release
2023-06-22
-
Changes to number of boards displayed
-
Added extra save button
HubSpot Integration for monday.com
HubSpot Integration for monday.com
This app has two purposes: to automatically add HubSpot contacts to your monday tables and to integrate HubSpot forms into your monday dashboard, board or item views. Let’s see how you can get started with using the app.
Add HubSpot contacts to monday
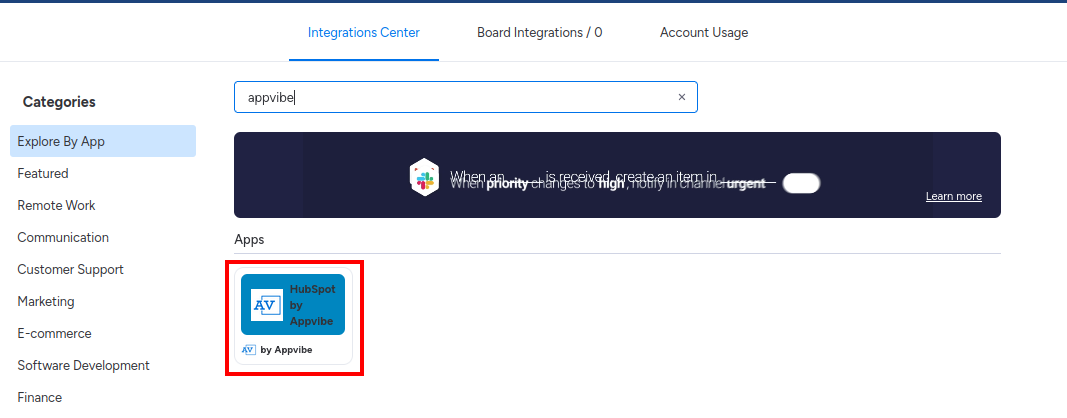
To add HubSpot contacts automatically to your monday tables first, you need to set up the integration. To do this, follow the steps below.
- Navigate to the monday table you wish to use for this.
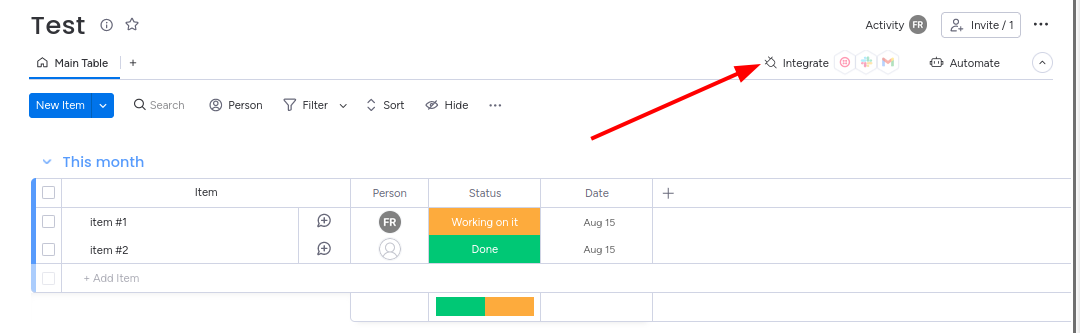
- Click on the “Integrate” button.

- Find the HubSpot integration by Appvibe and click on it.

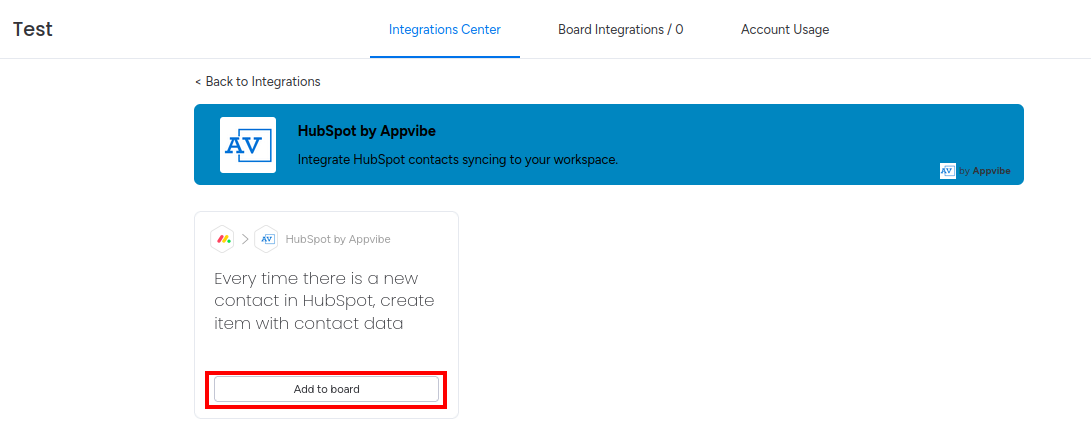
-
Currently, there is one available recipe: “Every time there is a new contact in HubSpot, create item with contact data”. Select “Add to board”

-
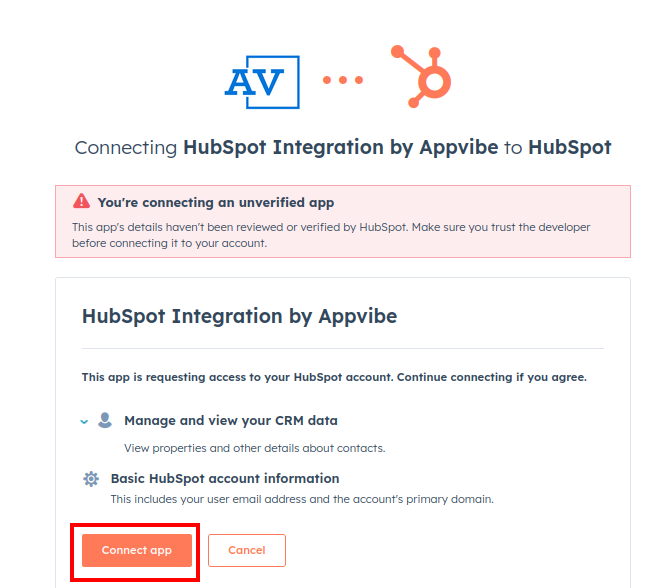
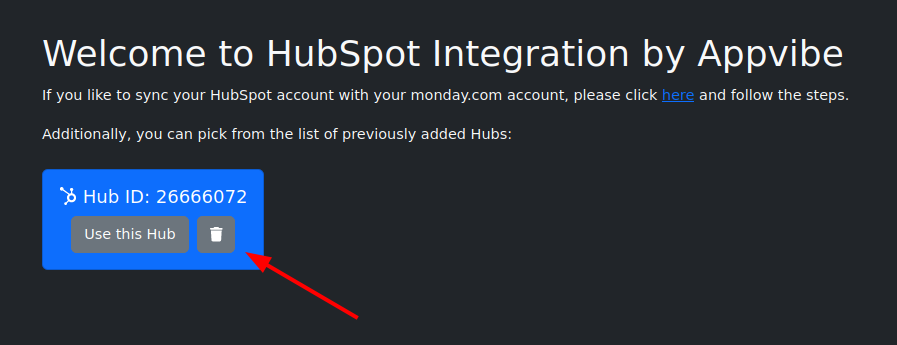
On the next page, click on the link to sync your HubSpot account.

-
If you previously used the app, you can click “Use this Hub” to make the set up faster.
-
Follow the directions on screen: log into your HubSpot account, choose your account, and click on the “Connect App” button.

-
Finally, click on the “Add to board” button again.

-
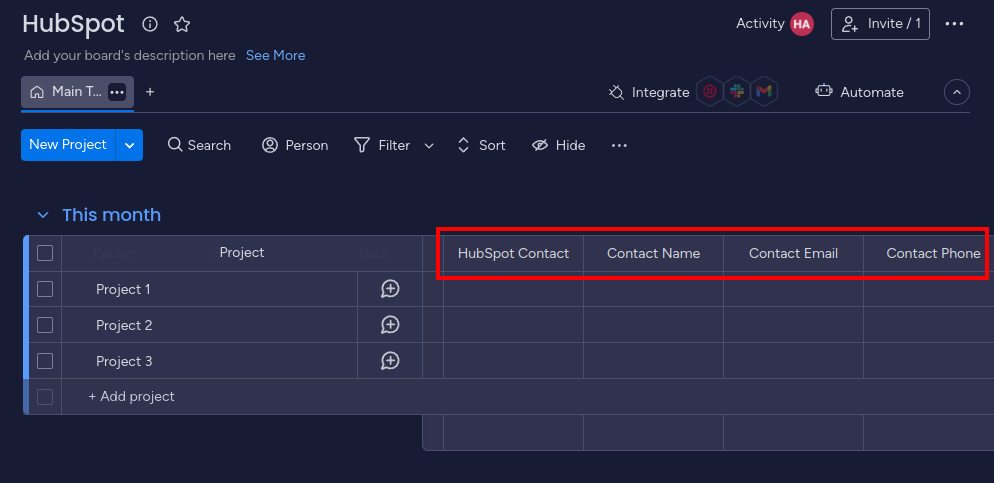
With this, you have successfully installed the integration.


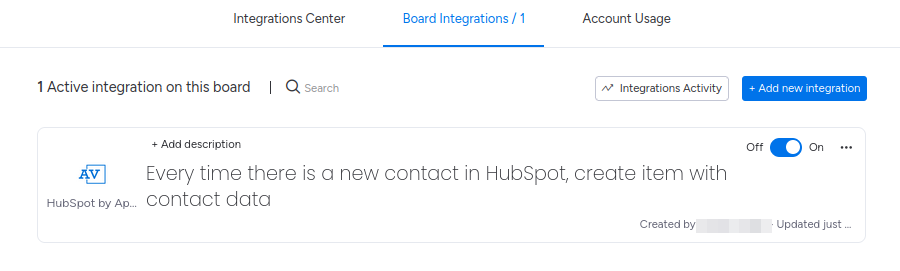
You will see four new columns on your table: HubSpot Contact, Contact Name, Contact Email and Contact Phone. Whenever you create a new HubSpot contact, this information will be automatically added to your monday table.
Remove the previously integrated HubSpot account
-
Navigate to “Integrate” on the board.
-
Search for the HubSpot Integration by Appvibe in the Intergation Center.
-
Click “Add to Board”.
-
On the next page click the delete icon next to the Hub:

Add HubSpot forms to monday
-
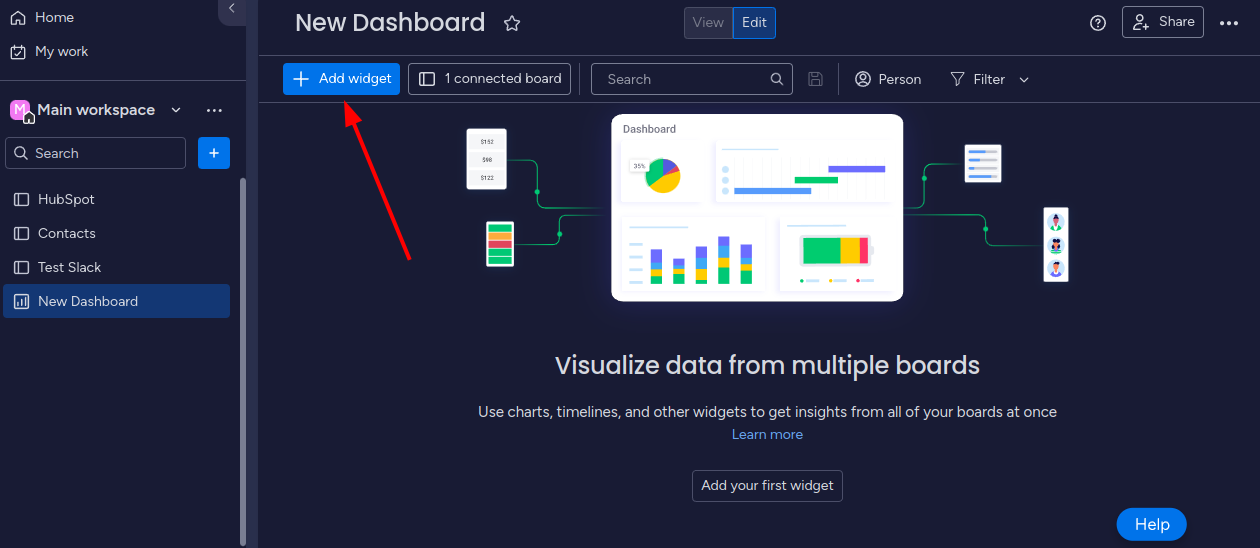
Navigate to the dashboard where you wish to add the HubSpot form, then click “Add widget”.
-
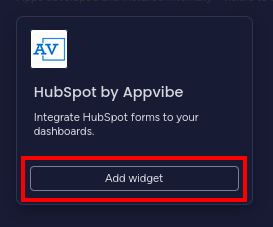
Search for HubSpot by Appvibe and click on “Add widget”.

-
On the configuration page of the app, review and follow the steps.

-
Open your HubSpot Dashboard.
-
Click on `Marketing > Forms` from the navigation menu.
-
Hover through the desired form from the list and click on `Actions > Share`, then click `Copy`
-
Add the copied URL into the first input field on the Configuration page.
-
You can change the Form Title with the second input field or leave it as it is, and then click “Save”.
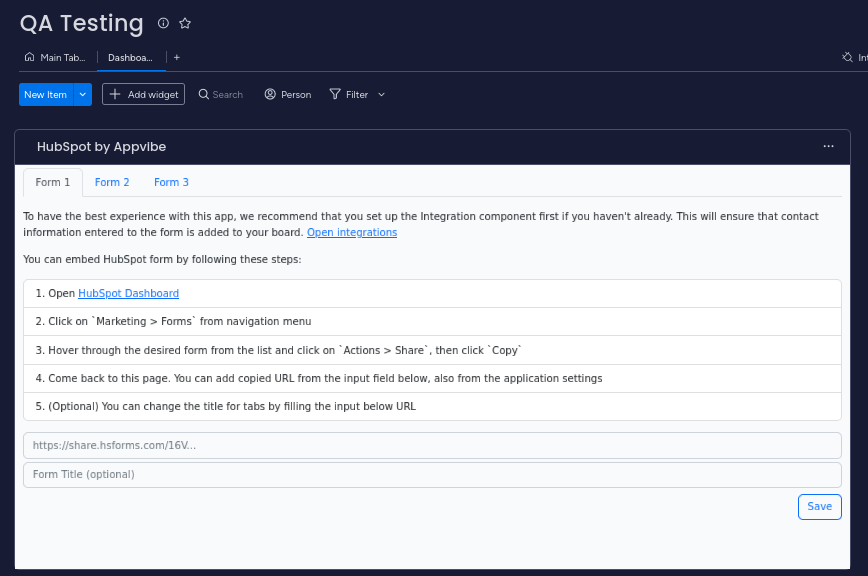


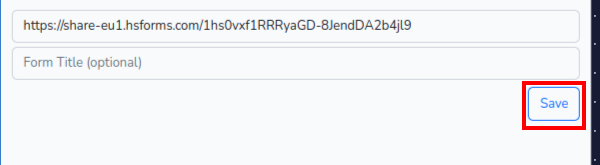
You have now successfully added your form to monday. Anyone who fills out your form will be added to your HubSpot account as a contact.
Google Sheets Integration for monday.com
Google Sheets Integration for monday.com
The purpose of this Google Sheets integration is to connect Google Sheets to your monday.com workspace. After installing the app, you will be able to add Google Sheets to either your board view or to individual items.
Installing the app
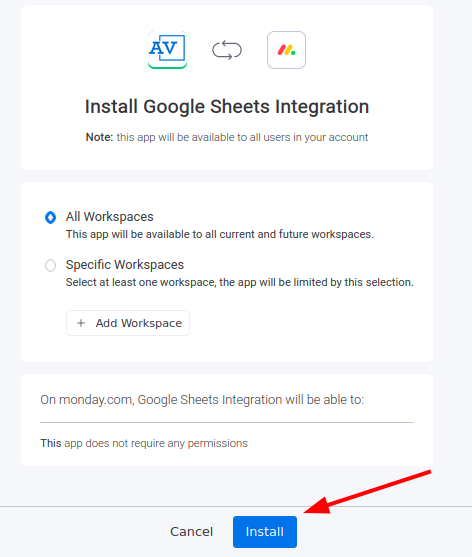
You can install the app with just a few clicks. The app doesn't require any permissions. So after following the installation link, choose which workspaces you want to add the app to, then simply click “Install.”
Adding a Google Sheet in board view
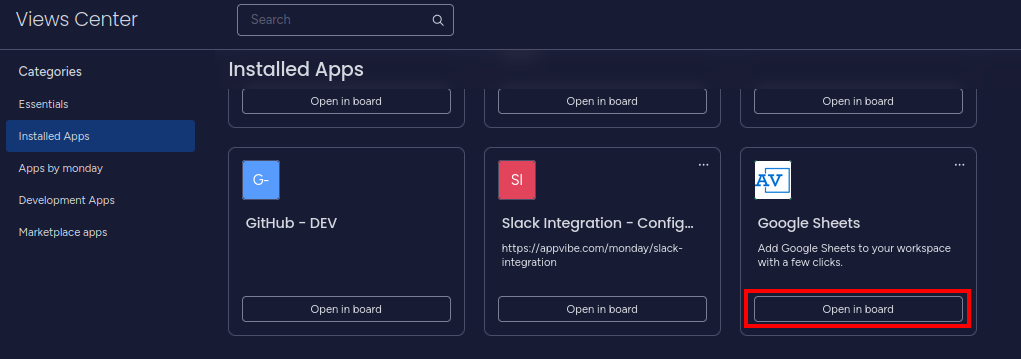
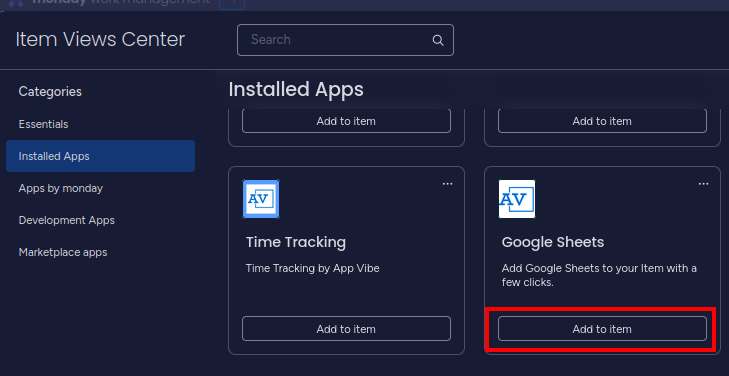
To add a Google Sheet in board view, click on the plus icon, then select “Apps”.
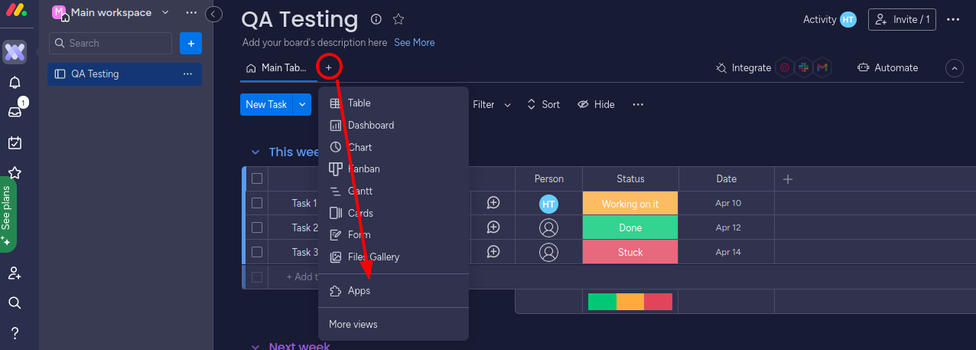
Here, find the Google Sheets integration and click “Open in board”.
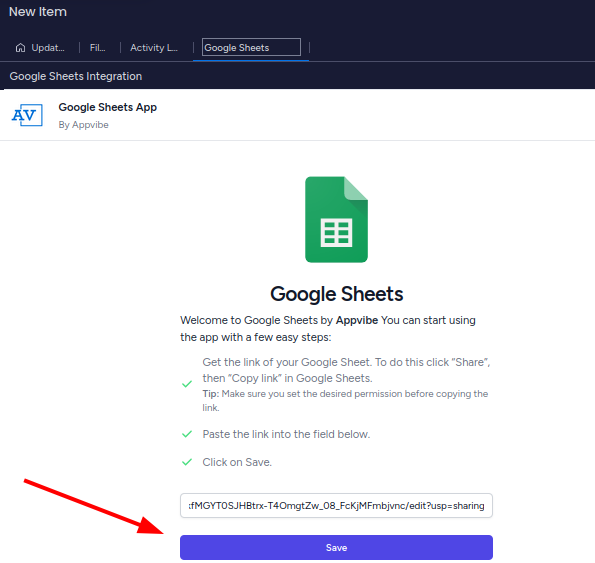
Paste the Google Sheet link into the field and click “Save”.
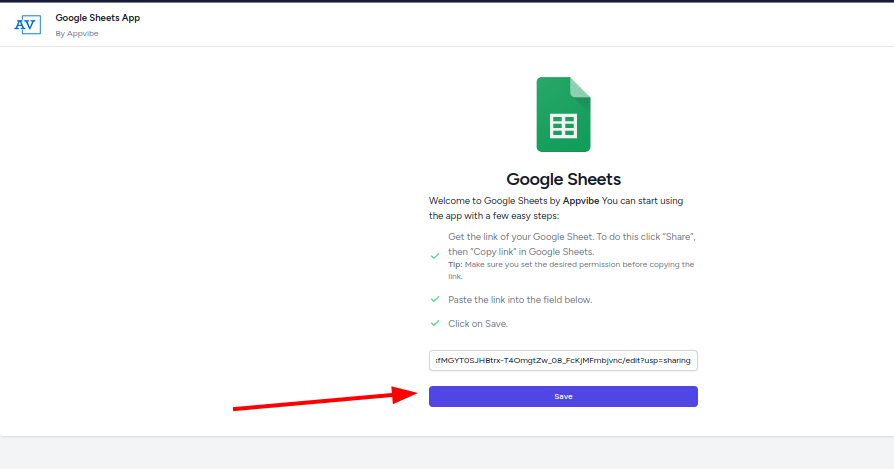
Before copying the URL, make sure you have selected the right permissions. If the sharing link has read-only permissions, you will only be able to view the sheet in monday but not edit it unless you are logged in.

Adding a Google Sheet to individual items
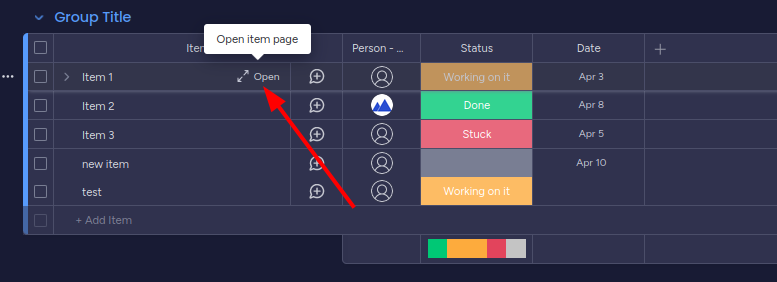
To add a Google Sheet to an item, find that work item on your table. Then hover over it and click on “Open”.
After this, click on the plus icon in the corner to add a new view.
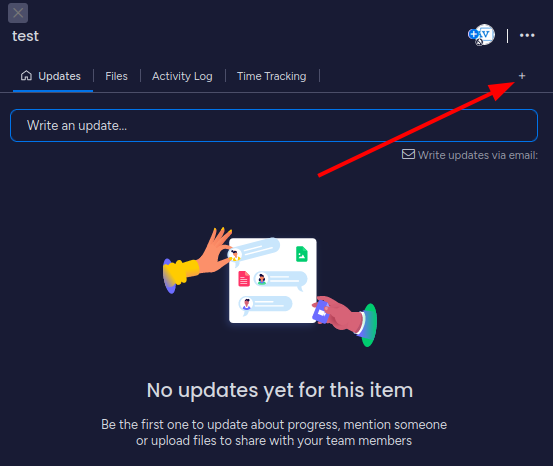
Finally, find Google Sheets integration and click “Add to item”.
Now you can enter your Google Sheets link into the field and click “Save”.
Adding a Google Sheet to a Dashboard
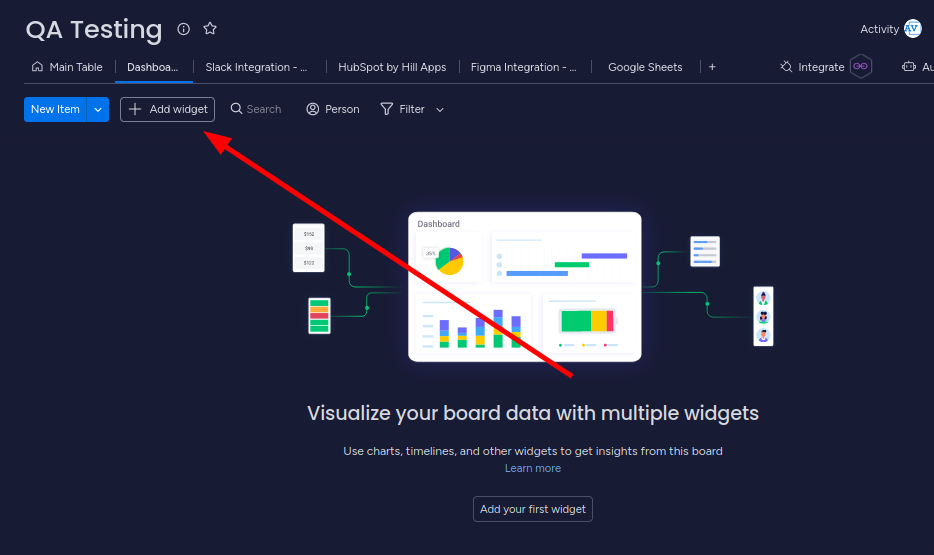
To add a Google Sheet to a Dashboard, click "Add widget". Select "Apps" from the list.
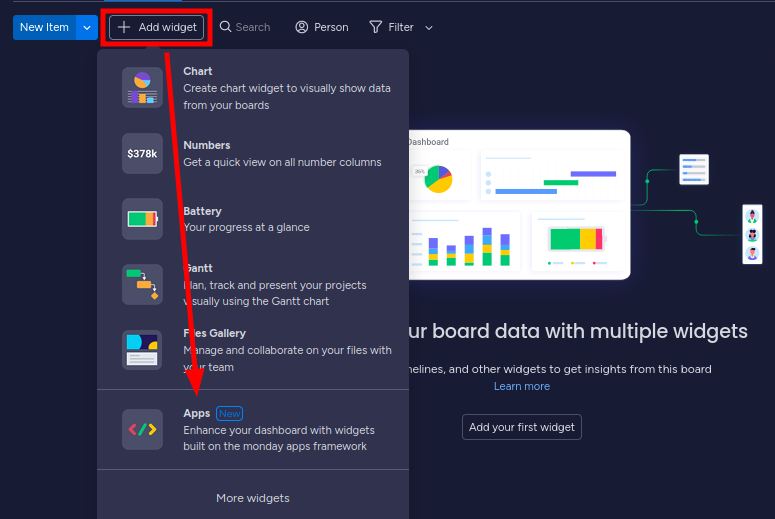
Here, find the Google Sheets integration under "Installed Apps" and click "Add widget".
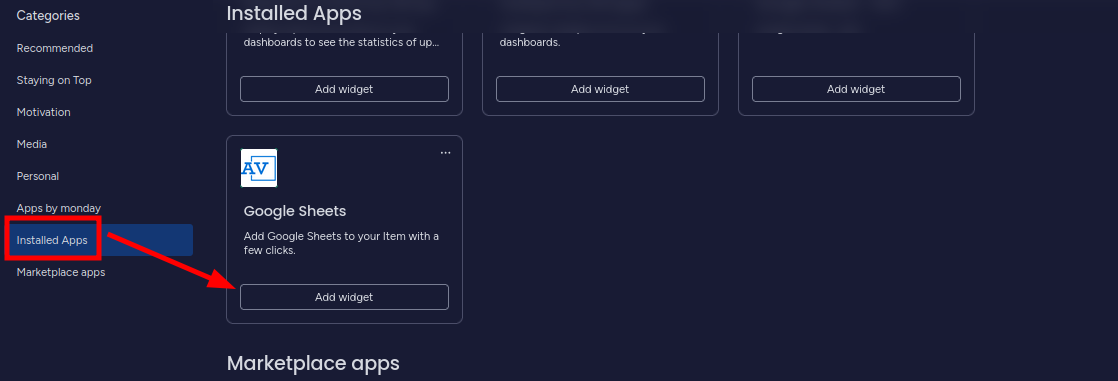
You can resize the widget on your dashboard to be able to easily see the app by dragging the corner. Insert the Google link as described above and click on "Save" to display it.

Publish to Web Sharing
In addition to using the "Share" function to get the Google Sheets link as described above, now you can also add Google Sheets that are published to the web.
To do this, on the Google Sheets page from the top menu select File -> Share -> Publish to web.
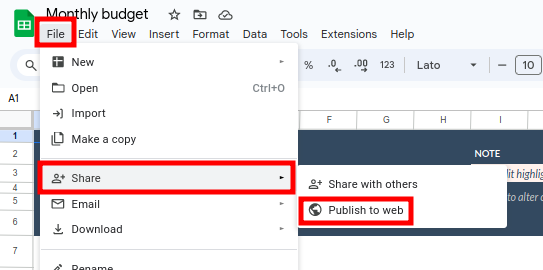
Then, on the "Link" tab click on the "Publish" button. Copy the appearing link and paste it into our app as usual.

If you need any help with our app, or if you have any suggestions for us to make it better, please get in touch with our support team. We will be more than happy to help.
FAQ
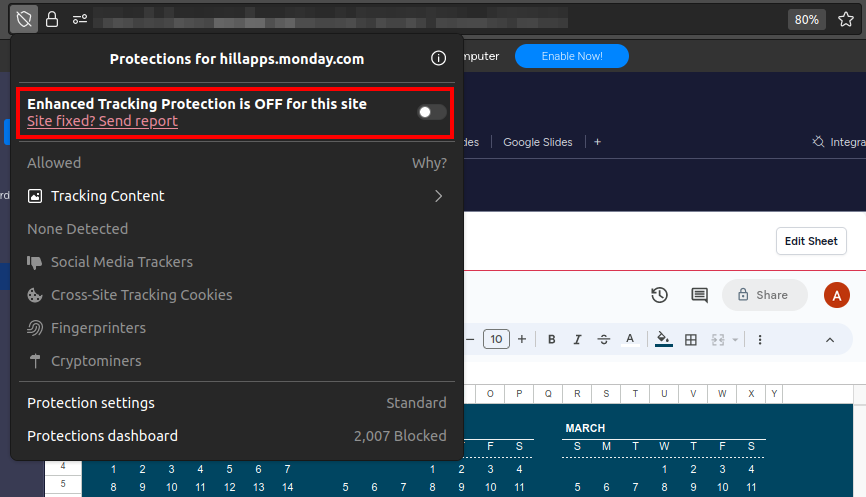
I’m using Firefox and I cannot log in to my Google account in the embedded Google Sheet. What can I do?
If you are experiencing log-in issues with Firefox, for example: cannot log in via the embedded Google Sheet, you are shown as logged out or the account menu doesn’t work properly, please disable Firefox’s Enchanced Tracking Protection.
For this, simply click on the shield icon next to the address bar and toggle “Enchanced Tracking Protection“ OFF.

Release Notes
2023-04-14
- Initial release
2023-08-14
- Updated UI and logo
Google Slides for monday.com
Google Slides Integration for monday.com
The purpose of this Google Slides integration is to connect Google Slides to your
workspace. After installing the app, you will be able to add Google Slides to either your board view or to individual items.
Installing the app
You can install the app with just a few clicks. The app doesn't require any permissions. So after following the installation link, choose which workspaces you want to add the app to, then simply click “Install.”

Adding a Google Slide in board view
To add a Google Slide in board view, click on the plus icon, then select “Apps”.

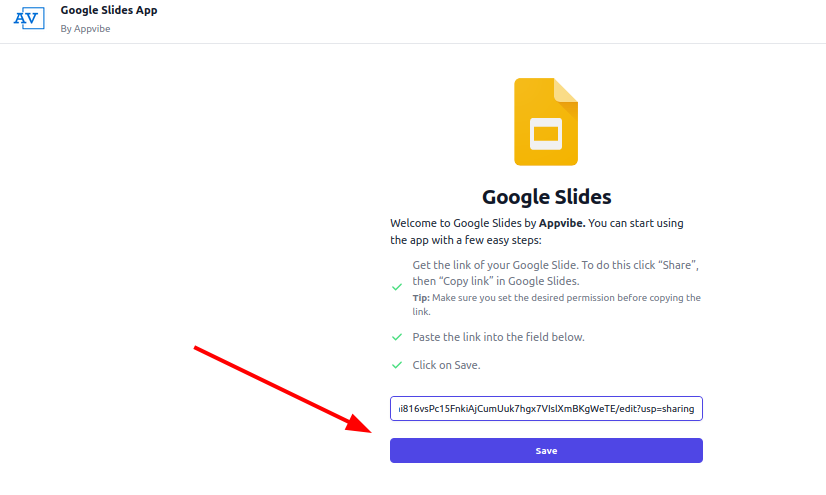
Here, find the Google Slides integration and click “Open in board”.

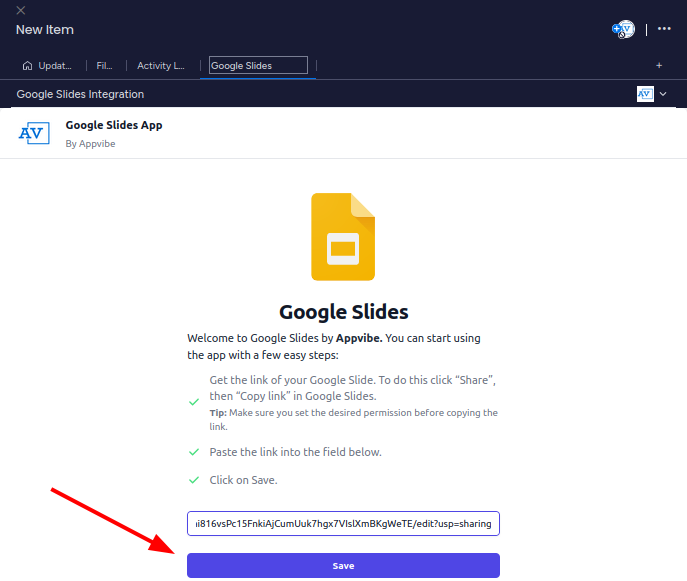
Paste the Google Slide link into the field and click “Save”.
Before copying the URL, make sure you have selected the right permissions. If the sharing link has read-only permissions, you will only be able to view the slides in monday but not edit it unless you are logged in.

Adding a Google Slide to individual items
To add a Google Slide to an item, find that work item on your table. Then hover over it and click on “Open”.

After this, click on the plus icon in the corner to add a new view.
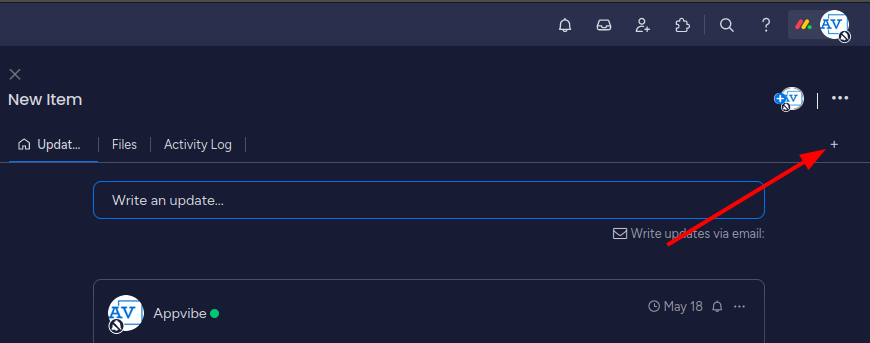
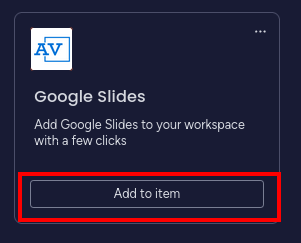
Finally, find Google Slides integration and click “Add to item”.
Now you can enter your Google Slides link into the field and click “Save”.
If you need any help with our app, or if you have any suggestions for us to make it better, please get in touch with our support team. We will be more than happy to help.
FAQ
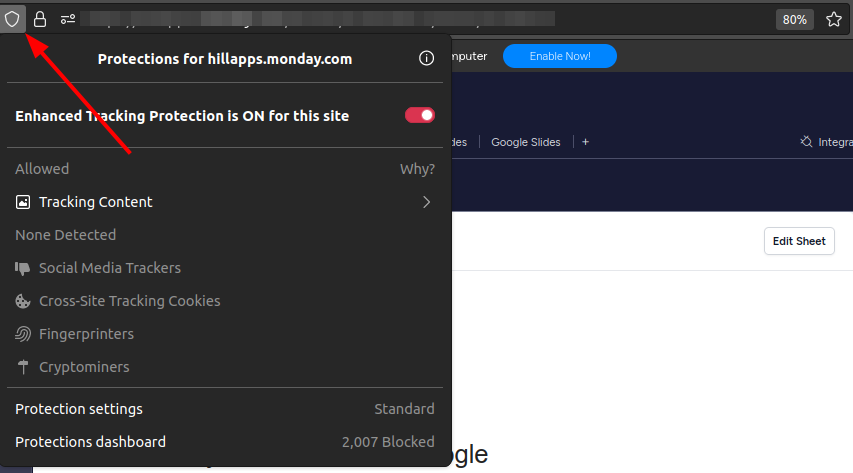
I’m using Firefox and I cannot log in to my Google account in the embedded Google Slides. What can I do?
If you are experiencing log-in issues with Firefox, for example: cannot log in via the embedded Google Slides, you are shown as logged out or the account menu doesn’t work properly, please disable Firefox’s Enchanced Tracking Protection.
For this, simply click on the shield icon next to the address bar and toggle “Enchanced Tracking Protection“ OFF.

When I try adding a Google Slide, nothing happens. What should I do?
If you click the Add button, and nothing happens, please make sure you have enabled third-party cookies in your browser. Next to the URL, click on the eye icon:
If third-party cookies are blocked, it would look like this:
Please make sure to toggle the third-party cookies setting to "enabled" then refresh the page and try again.
Please note that in other browsers you might find this setting in a different place.
Release Notes
2023-04-14
- Initial release
2023-08-14
- Updated UI and logo
Canva Integration for monday.com
The purpose of this application is to embed Canva designs, documents, presentations, etc. into your monday.com boards and items.
Installing the app
You can install the app with just a few clicks. After following the installation link, choose which workspaces you want to add the app to, then click "Install".

Adding a Canva design in board view
To add a Canva design in board view, click on the plus icon, then select “Apps”.
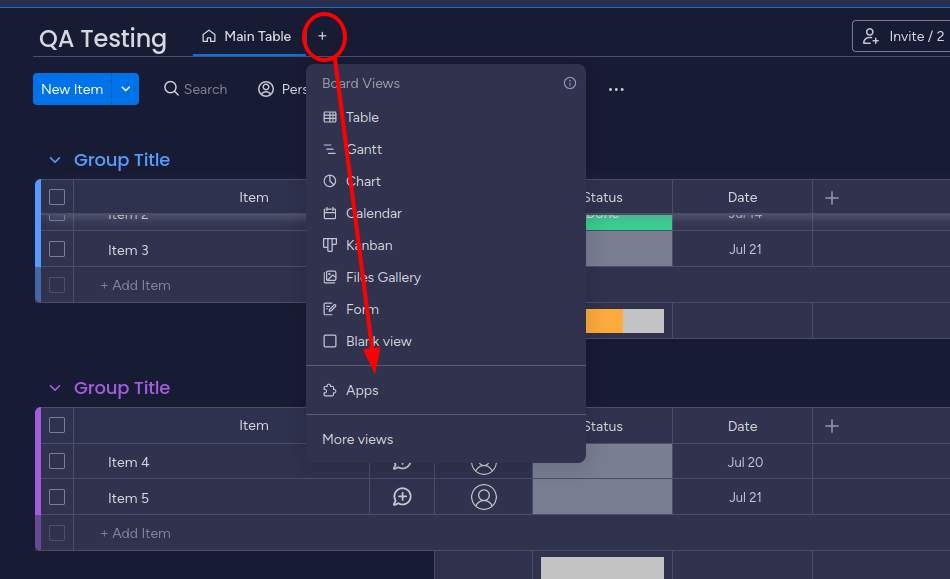
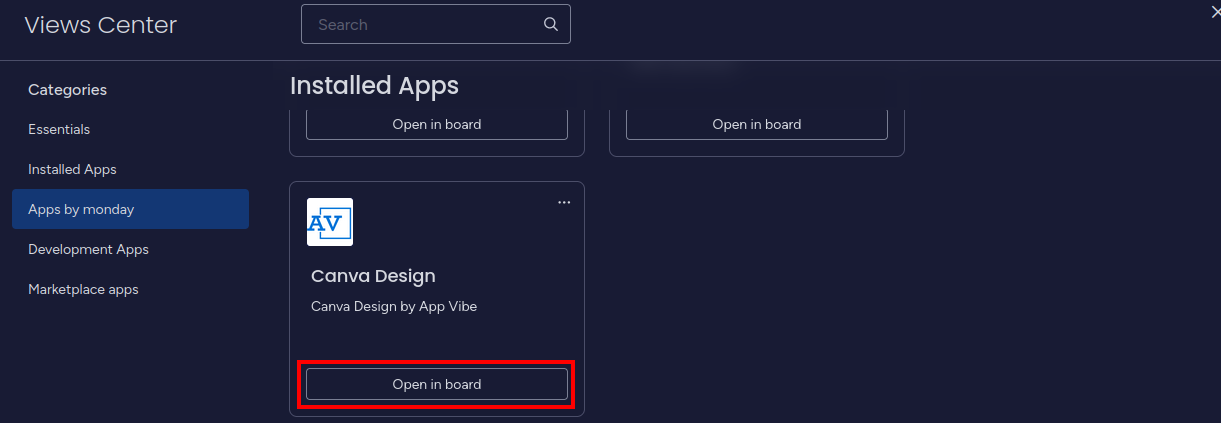
Here, find the Canva integration and click “Open in board”.
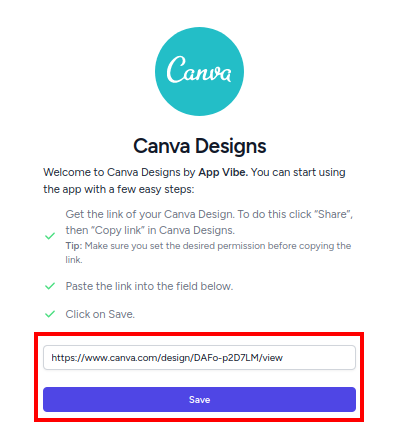
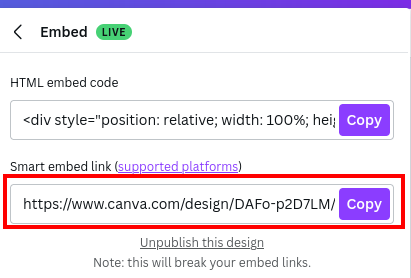
Then, you need to copy and paste the link of your Canva design. It is important to get the link in the right format. To do this, navigate to your Canva desgin, then go to Share > More > Embed > Smart embed link. Click on "Copy".
Paste the link to the app's field, then click on "Save".
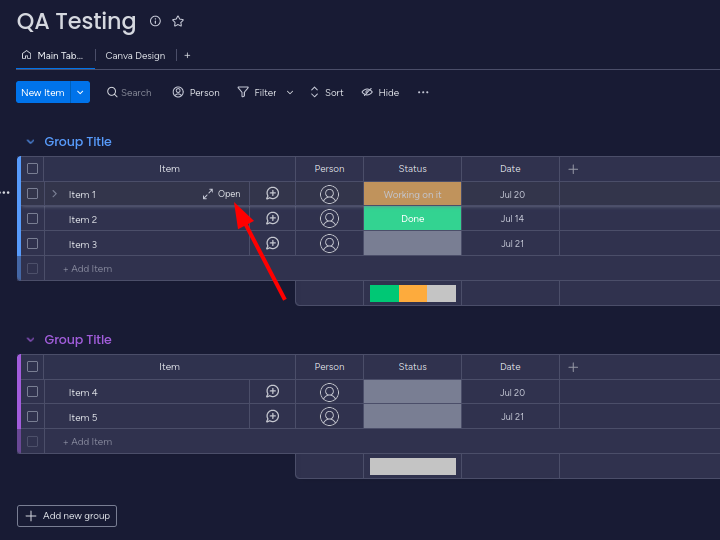
Adding a Canva design to individual items
To add a Canva design to an item, find that work item on your table. Then hover over it and click on “Open”.
After this, click on the plus icon in the corner to add a new view.
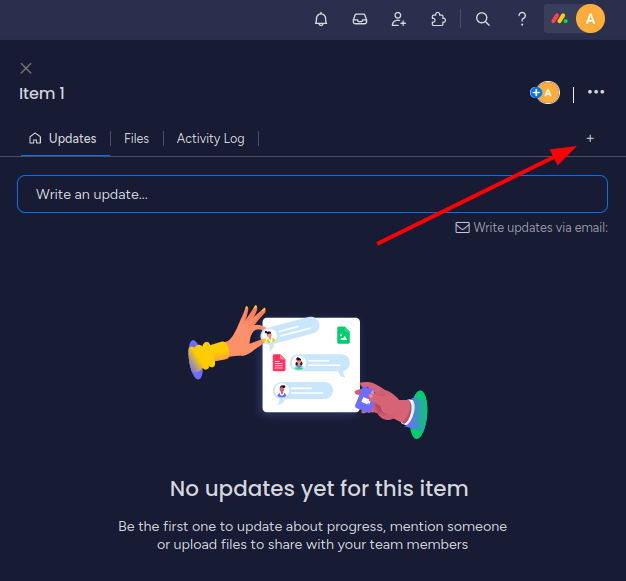
Finally, find the Canva integration and click “Add to item”.
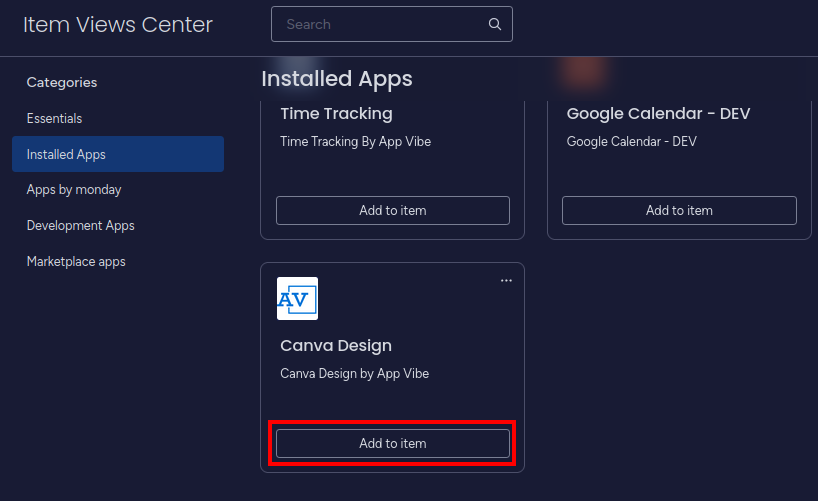
Now you can enter your Canva design link into the field and click “Save”.
If you need any help with our app, or if you have any suggestions for us to make it better, please get in touch with our support team. We will be more than happy to help.
FAQ
I’m getting an error after adding adding the Canva link what should I do?
If you are getting an error after embedding the Canva link, it is possible that you copied the URL in the wrong format. Please navigate to Share > More > Embed > Smart embed link, and copy that link.
When I try adding a Canva design, nothing happens. What should I do?
If you click the Add button, and nothing happens, please make sure you have enabled third-party cookies in your browser. Next to the URL, click on the eye icon:
If third-party cookies are blocked, it would look like this:
Please make sure to toggle the third-party cookies setting to "enabled" then refresh the page and try again.
Please note that in other browsers you might find this setting in a different place.
Release Notes
2023-07-20
-
Initial release
Google Calendar Integration for monday.com
Google Calendar Integration for monday.com
The purpose of this Google Calendar integration is to connect Google Calendar to your monday.com workspace. After installing the app, you will be able to add Google Calendars to either your board view or to individual items.
Installing the app
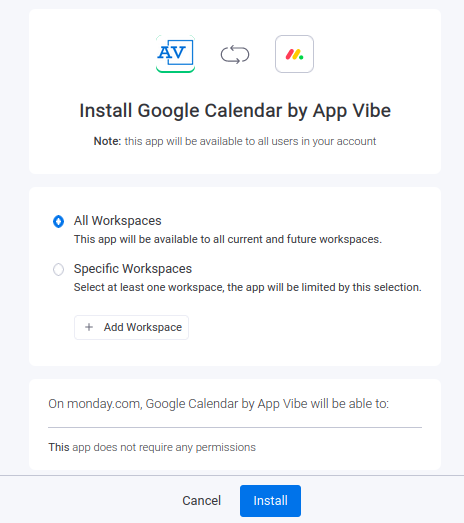
You can install the app with just a few clicks. After following the installation link, choose which workspaces you want to add the app. Review the permissions, then click “Install.”
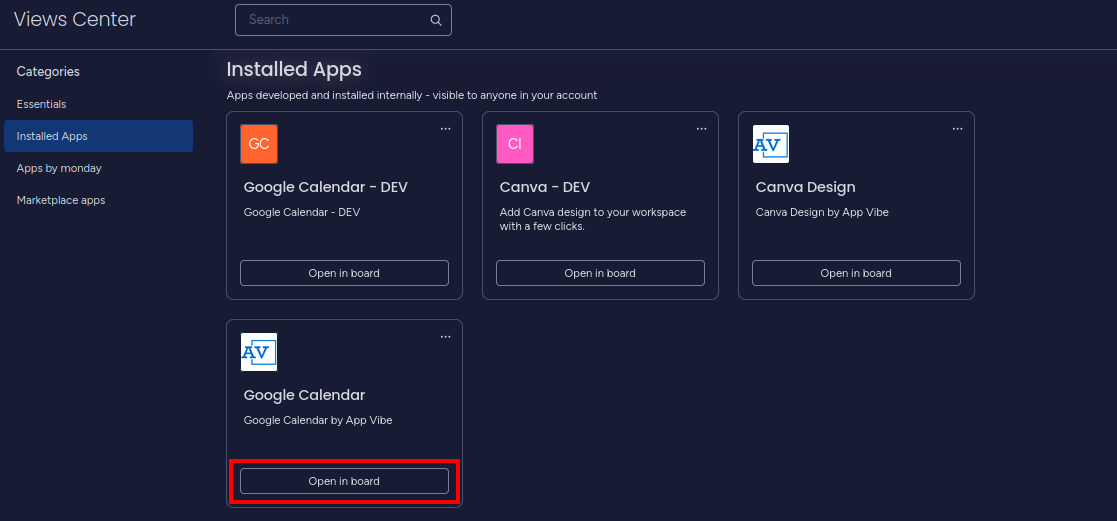
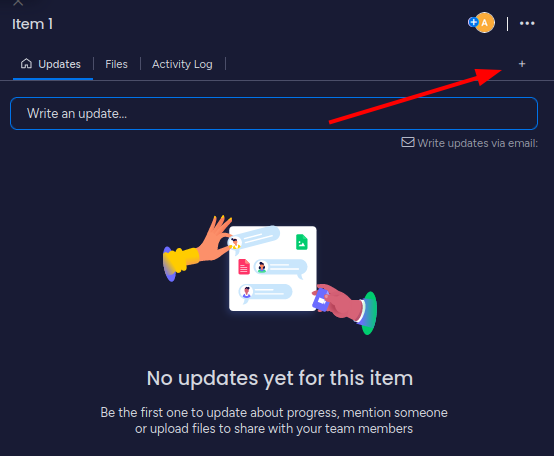
Adding a Google Calendar in board view
To add a Google Calendar in board view, click on the plus icon, then select “Apps”.
Here, find the Google Calendar integration and click “Open in board”.
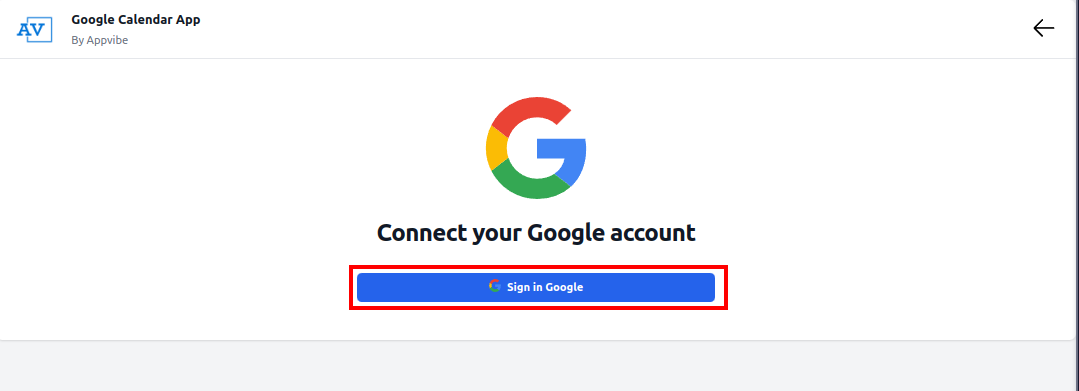
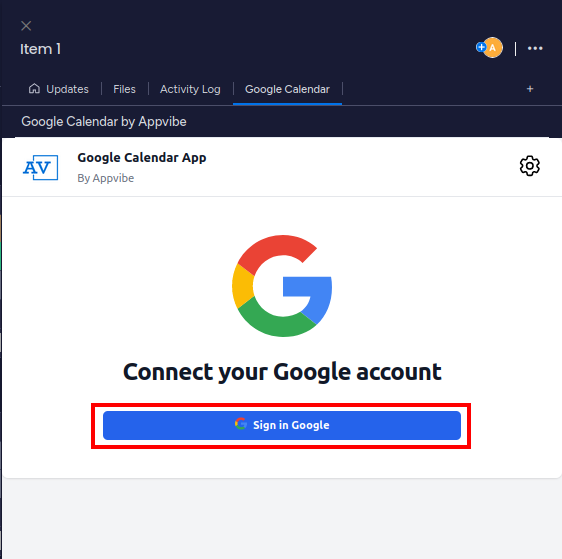
Then you need to sign in to your Google account. Click on the sign-in button and follow the instructions on the screen.
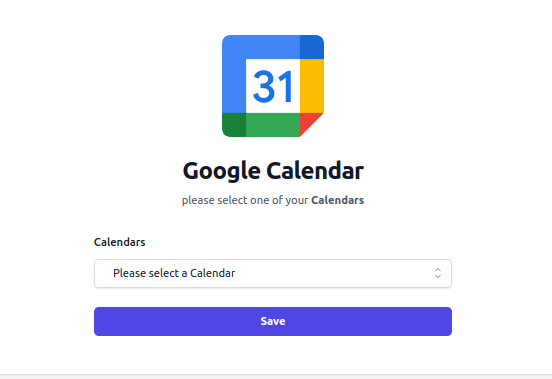
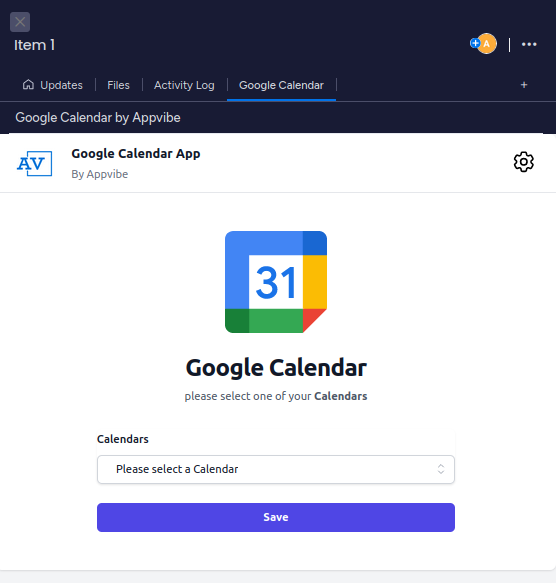
After this, select the Calendar from the dropdown that you wish to add, then click "Save".
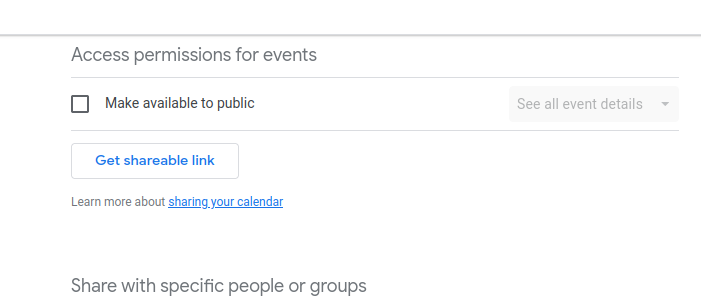
Please note, that the Calendar either has to be set to public, or your Google account has to have access to it. To access these settings go to your Google Calendars, open Settings, select the Calendar and then click on "Access permissions for events". Double-check the settings before selecting the calendar in the app.
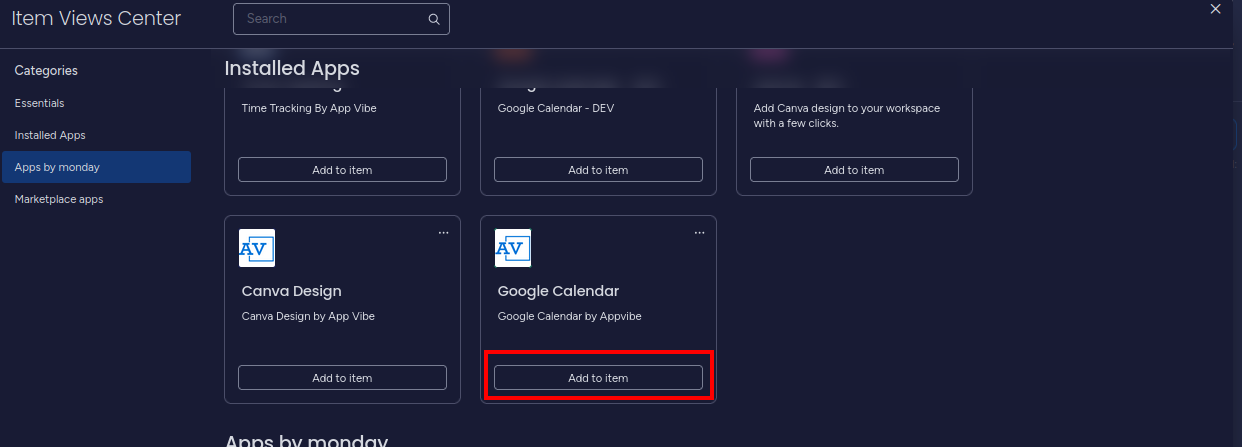
Adding a Google Calendar to individual items
To add a Google Calendar to an item, find that work item on your table. Then hover over it and click on “Open”.
After this, click on the plus icon in the corner to add a new view.
Finally, find Google Calendar integration and click “Add to item”.
After this, click on the button to sign in to your Google account.
If you need any help with our app, or if you have any suggestions for us to make it better, please get in touch with our support team. We will be more than happy to help.
FAQ
I'm getting a warning while logging in to my Google account, what should I do?
You might face a warning while trying to log into your Google account. Please note that this is temporary, only until Google verifies the app. To proceed, click on 'Advanced'.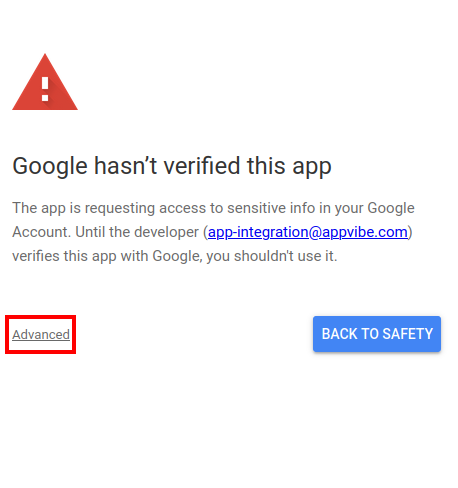
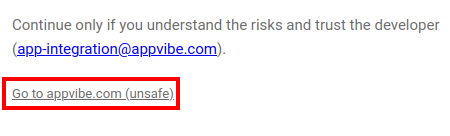
Then, click on "Go to appvibe.com (unsafe)"

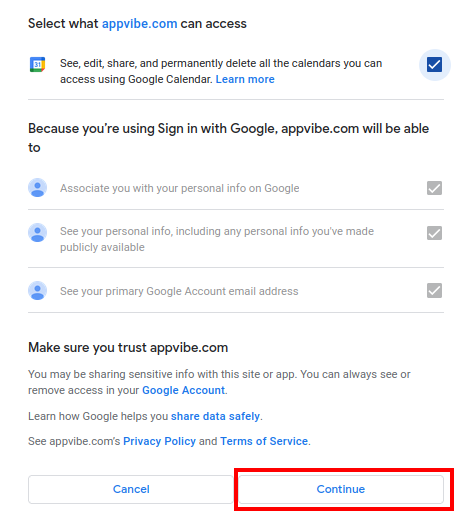
Finally, check all checkboxes and click "Continue":

Release Notes
2023-07-20
-
Initial release
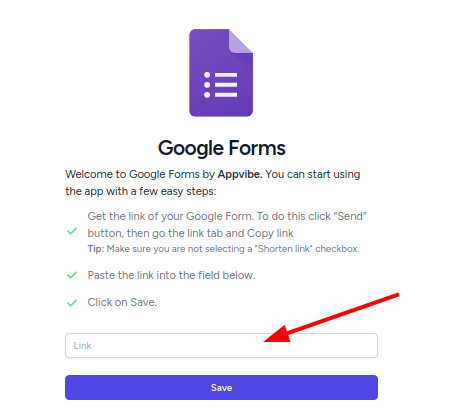
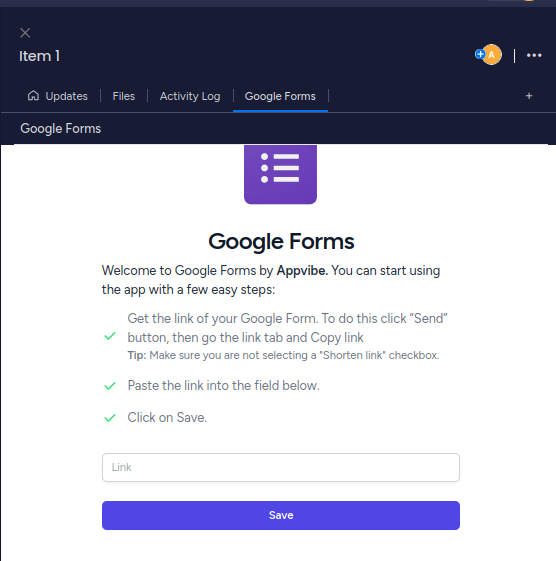
Google Forms Integration for monday.com
Google Forms Integration for monday.com
The purpose of this Google Forms integration is to connect Google Forms to your monday.com workspace. After installing the app, you will be able to add Google Forms to either your board view or to individual items.
Installing the app
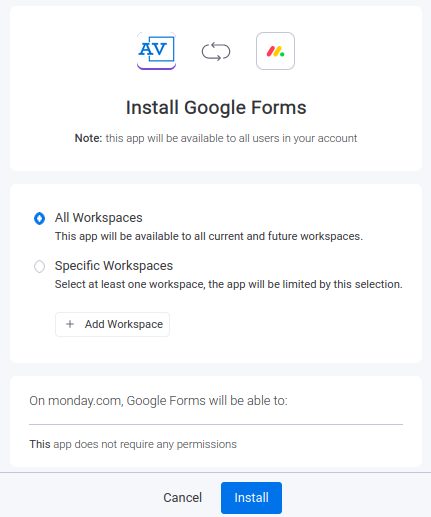
You can install the app with just a few clicks. After following the installation link, choose which workspaces you want to add the app. Review the permissions, then click “Install.”
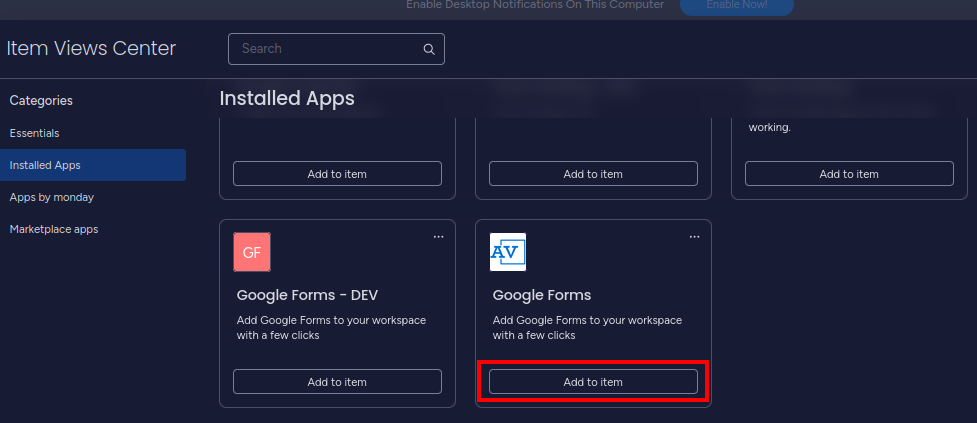
Adding a Google Forms in board view
To add a Google Form in board view, click on the plus icon, then select “Apps”.
Here, find the Google Forms integration and click “Open in board”.

Now you can enter your Google Forms link into the field and click “Save”.
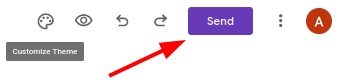
To get the link in the correct format, navigate to your Google Form and click "Send" in the top right corner:
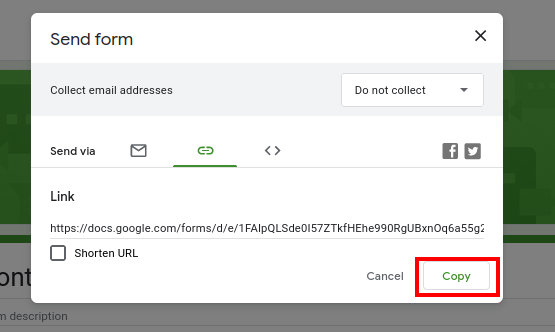
Click on the "Link" tab, and copy the link from there. Make sure the "Shorten URL" option is not checked.
Adding a Google Form to individual items
To add a Google Form to an item, find that work item on your table. Then hover over it and click on “Open”.
After this, click on the plus icon in the corner to add a new view.
Finally, find the Google Forms integration and click “Add to item”.
After this, enter the link to the Google Form and click on "Save".
If you need any help with our app, or if you have any suggestions for us to make it better, please get in touch with our support team. We will be more than happy to help.
FAQ
I’m using Firefox and I cannot log in to my Google account. What can I do?
If you are experiencing log-in issues with Firefox, for example: cannot log in via the embedded Google Form, or can't enter any data, please disable Firefox’s Enchanced Tracking Protection.
For this, simply click on the shield icon next to the address bar and toggle “Enchanced Tracking Protection“ OFF.
When I try adding a Google Form, nothing happens. What should I do?
If you click the Add button, and nothing happens, please make sure you have enabled third-party cookies in your browser. Next to the URL, click on the eye icon:
If third-party cookies are blocked, it would look like this:
Please make sure to toggle the third-party cookies setting to "enabled" then refresh the page and try again.
Please note that in other browsers you might find this setting in a different place.
Release Notes
2023-07-25
-
Initial release
Using the apps in incognito window
To be updated later
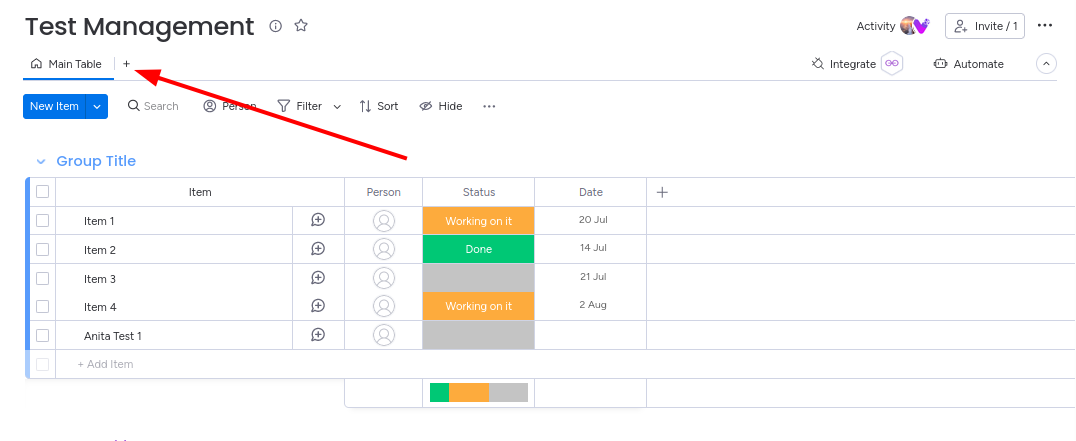
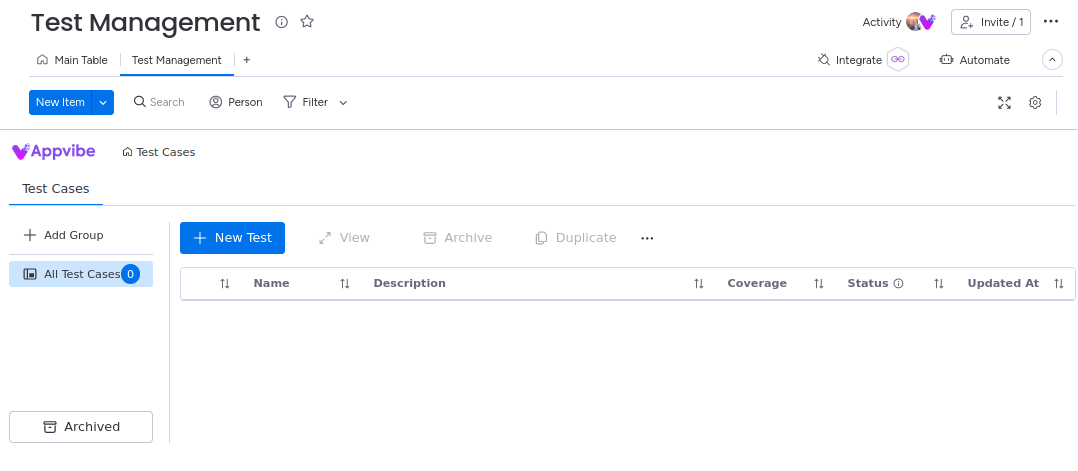
Test Management for monday.com
The purpose of this Test Management application is to create and execute tests in your monday.com account. The app has two main views: the board view and the item view. The purpose of the board view is to create, edit, and organize your tests, as well as to add steps that can be executed. The purpose of the item view is to execute these tests and record the results.
Getting Started
After installing the app, first, add it to your board view, by following these steps:
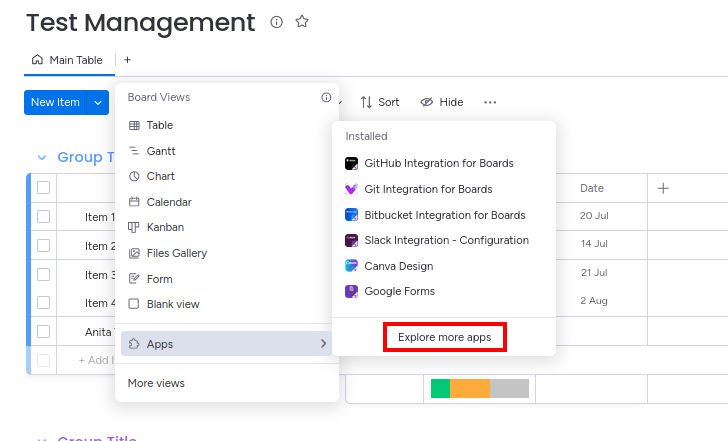
- Click on the + icon for your monday board

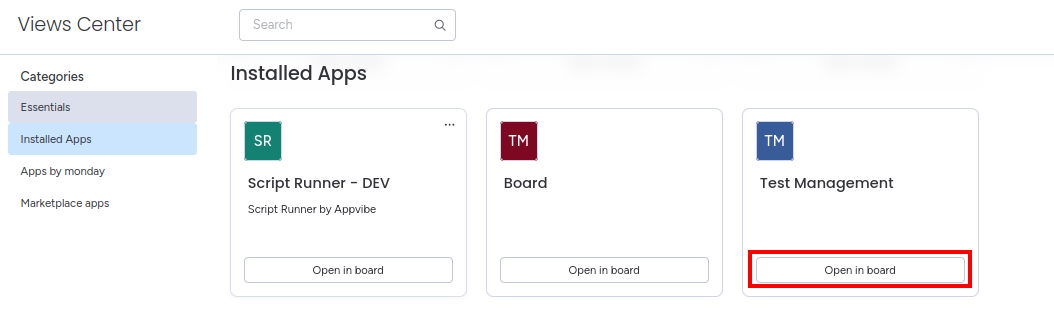
- Go to "Apps" > "Explore more apps"

- Under "Installed Apps" find the Test Management app and click on "Open in board"

- Now the app is added to your board:

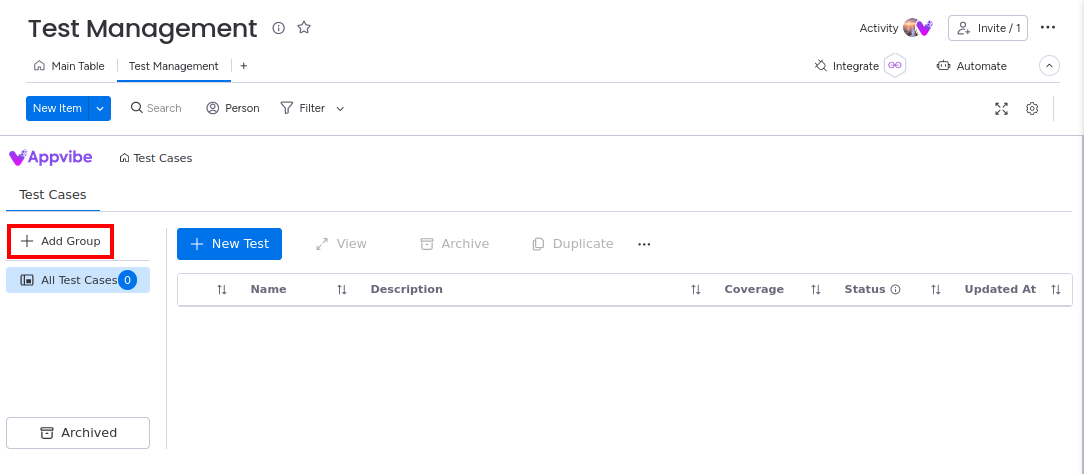
Create a Test Group
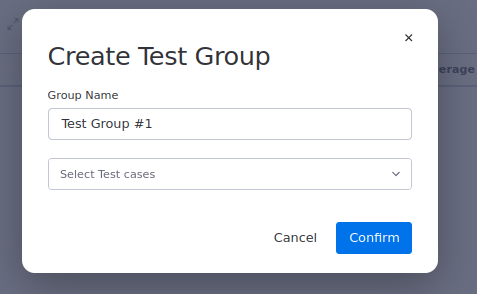
- To create a test group, click on "Add Group"

- Fill in the name. If you have already added test cases, you can select them from the dropdown.

- Click on Confirm to save.
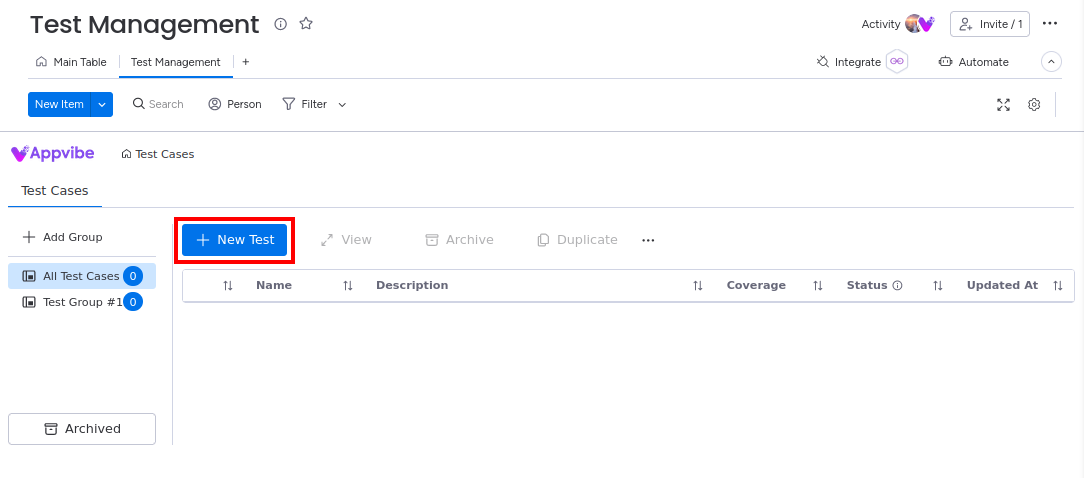
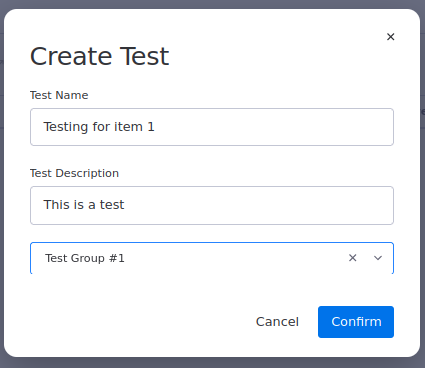
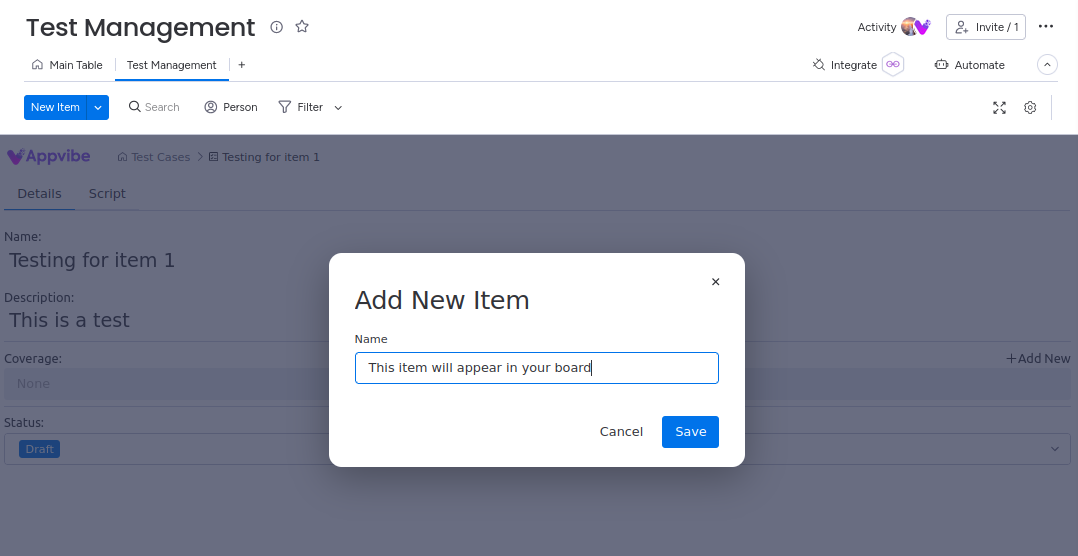
Create a Test Case
- To create a test case, click on "New Test".

- Fill out the details. If you have already added a test group, you can select it from the dropdown.

- Click on Confirm to save.
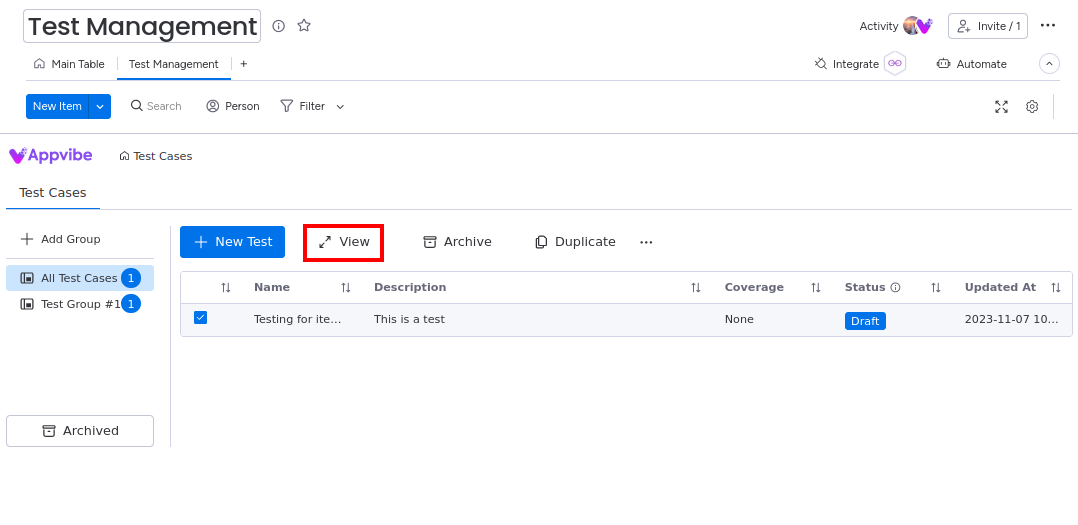
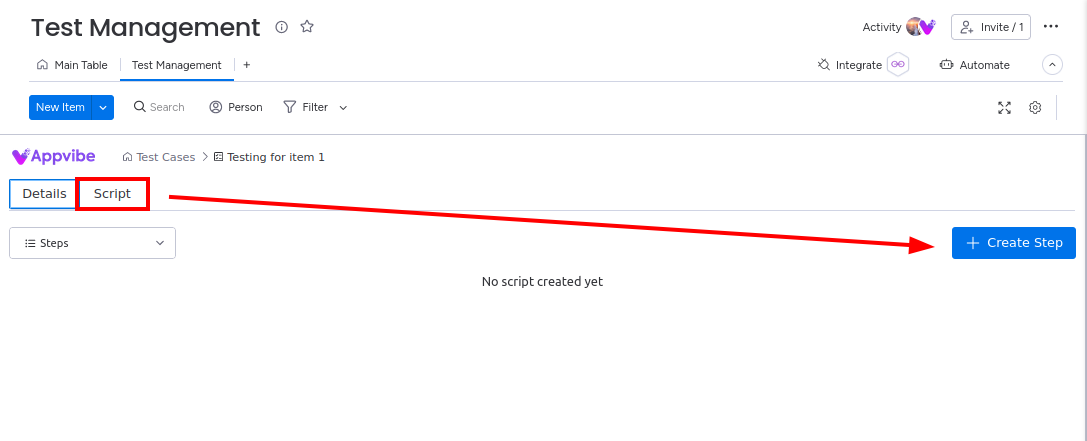
Edit the test case and add testing steps
- Select a test case from the table by checking the box next to it

- Click on "View" in the menu

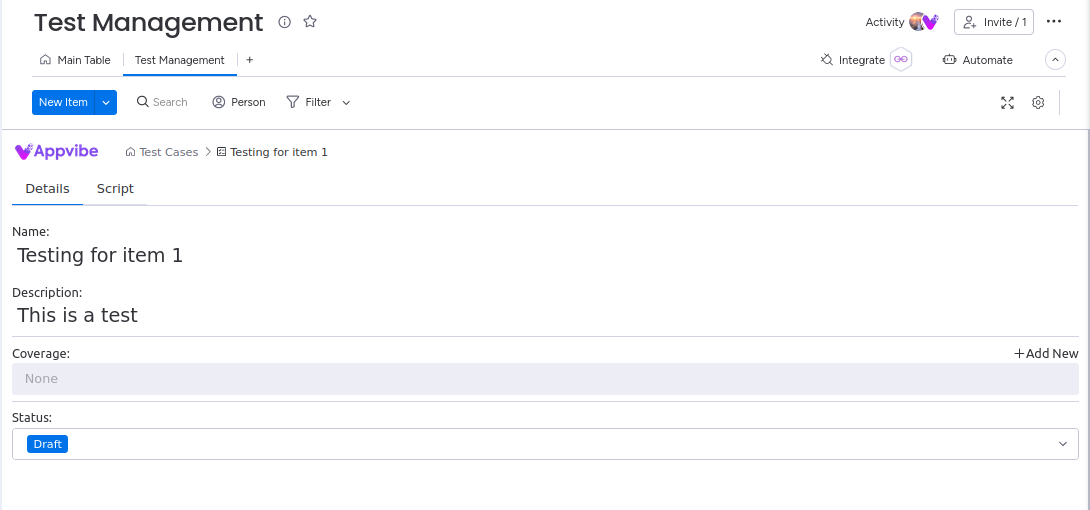
- Here, you can edit the basic details of the test. You can also edit the status of the test Draft/Approved/Declined. This can be used to signal to the team which tests should be used.

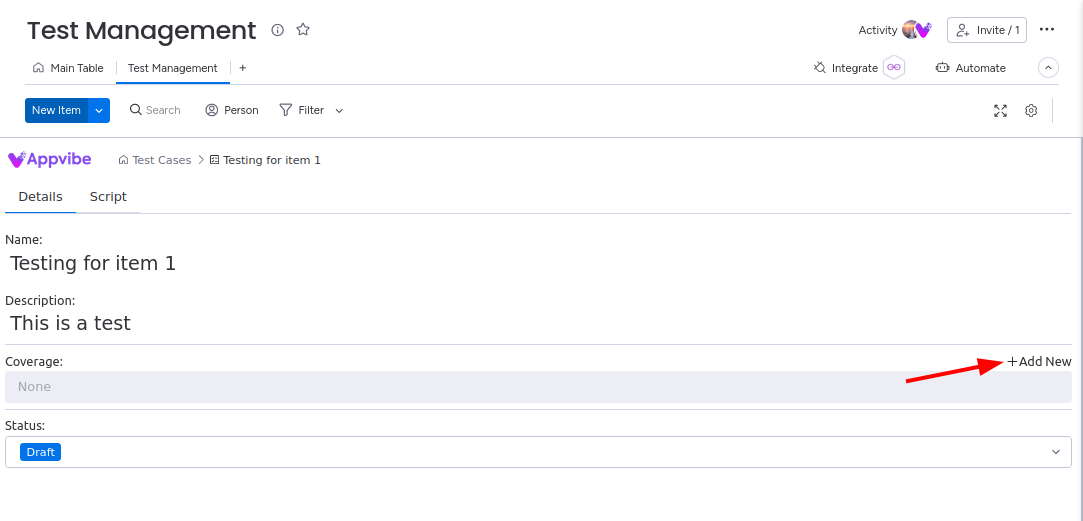
- Use the "Coverage" field to add tests to your monday board "Main Table". This will allow you and your team to execute the steps you add to the test. You can add multiple items to one test case.


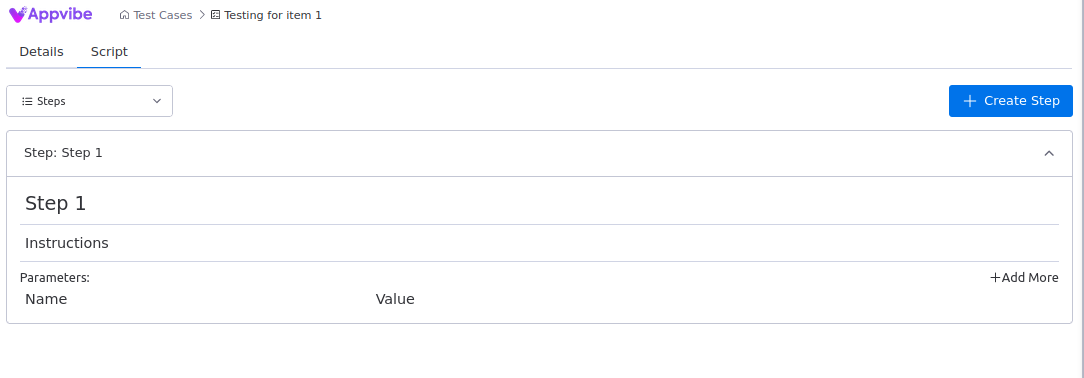
- To add testing steps, switch to the "Script" tab and click on "Create Step".

- Fill out the details of the testing step. Repeat it for as many testing steps you need.


Using the Item View
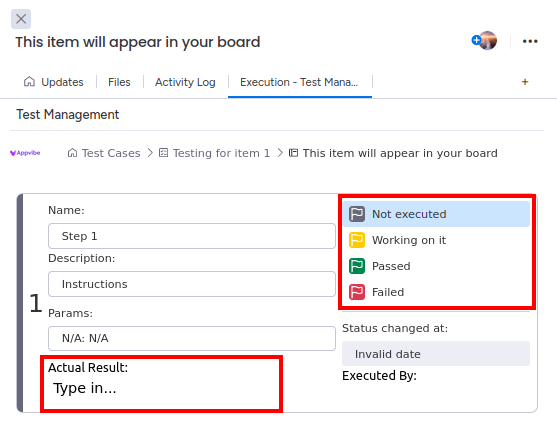
Use the item view to execute the testing steps you added according to the previous instructions.
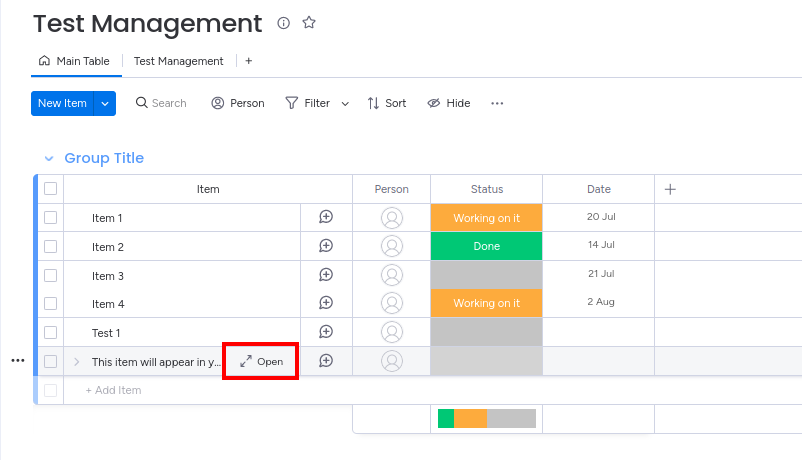
- Open the item you or a team mate has added from the "Coverage" field.

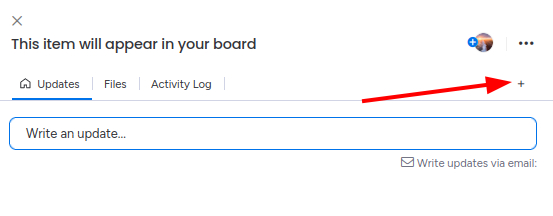
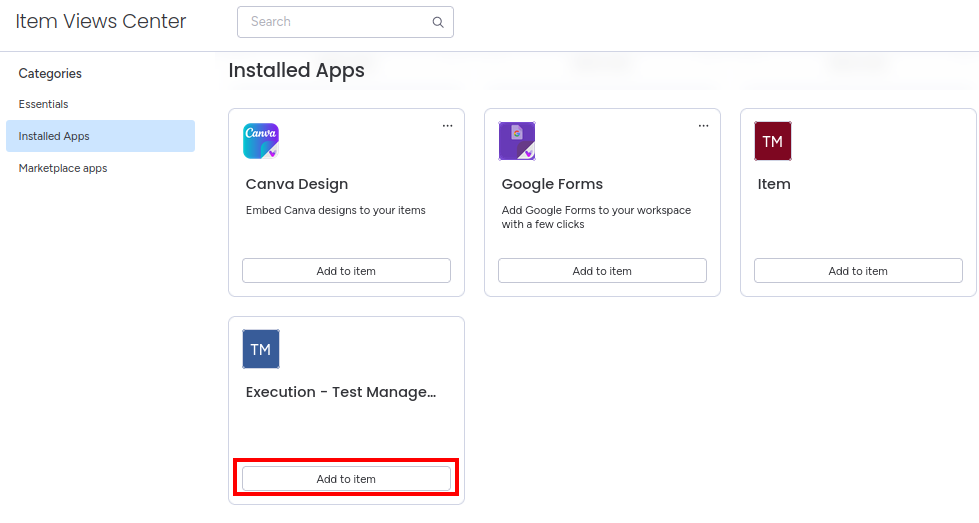
- If you don't see the Test Management Execution screen, click on the + icon and find it under the installed item views.


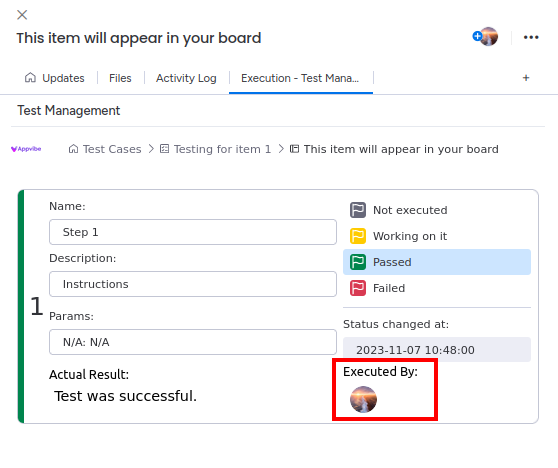
- On the execution screen, you can update the status of the testing step. You can also type in the actual result of your test.

- When you execute the testing step, the app will record that you worked on it.

Release Notes
2023-11-07
- Initial release
Sync Items and Boards for monday.com
Sync Items and Boards for monday.com
The Sync Items and Boards application for monday.com provides an integration between your monday.com boards. With this, you can set up integrations to automatically change values on one board based on the values from another board. The app works similarly to the popular VLOOKUP feature for spreadsheets. The Sync Items and Boards app allows you to automate certain changes on your boards and make your monday work environment more productive, effective, and rewarding.
Getting Started
These straightforward actions will deliver the add-on to your monday.com instance just in a few clicks.
After installing the app, add the Configuration Board View to any of your boards by clicking the plus icon, then selecting “Apps” > "Explore more apps"
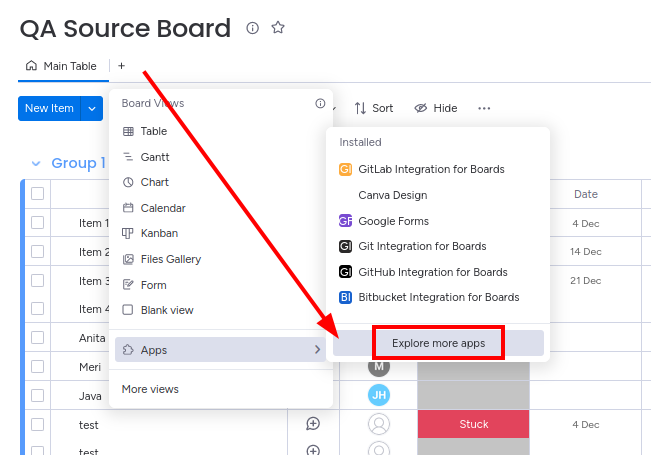
Here, find the Sync Items and Boards app - Configuration and click “Open in board”. Note that it doesn't matter which board you add this Configuration page to, it will control the configuration for your whole workspace.
Create a Static Configuration
Static configurations will control the synchronization between two boards. On the configuration page, there are two tabs. Under "Static Configurations" you can see all of your existing configurations. Under "Main" you can add a new configuration.
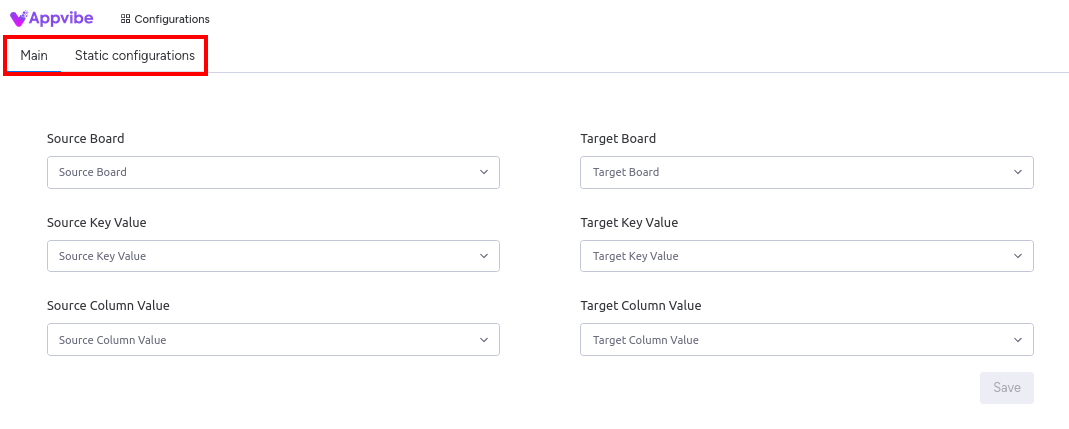
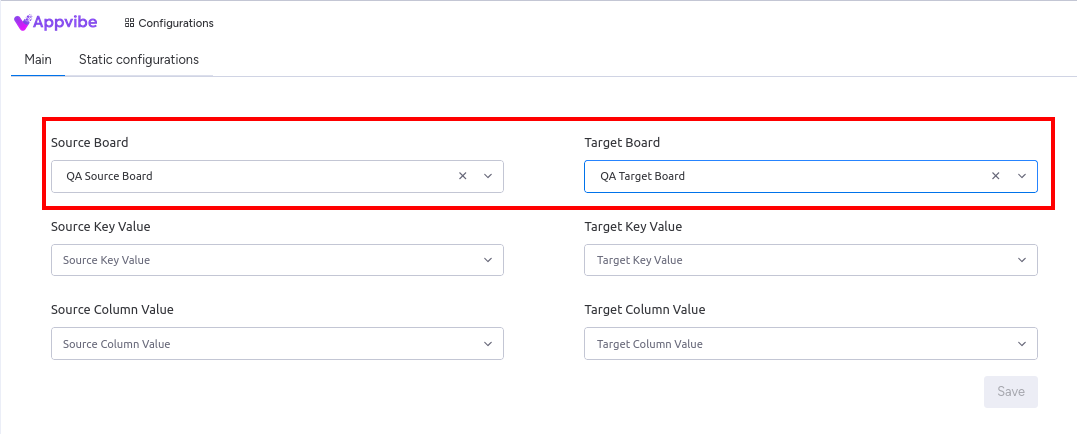
To add a new configuration, first select a Source Board and a Target Board. The Source board is where the integration takes the values from, and the Target board is where the changes will happen.
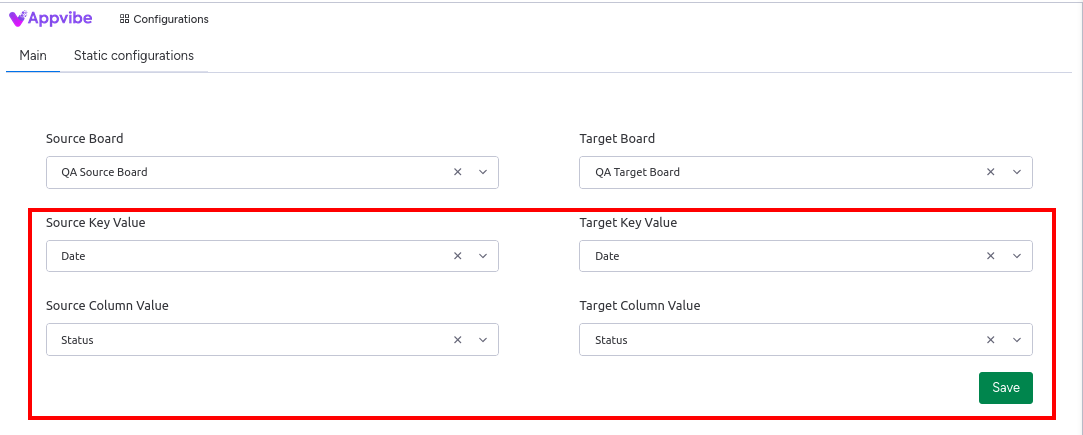
Next, fill in the last four dropdowns:
Source Key Value: This is a column on the source board. The integration will look for matching values in this column. When a change occurs on the target board, resulting in a cell value matching a cell value in this column on the source board, the integration will be triggered.
Target Key Value: This is a column on the target board. When someone changes a cell value in this column, the integration will start searching for matching values in the "Source Key Value" column on the source board. if the new value matches the value in the "Source Key Value" column, the integration will be triggered.
Source Column Value: This is a column on the source board. The value from this column will be taken and transferred to the target board after the integration is triggered.
Target Column Value: This is a column on the target board. The value of the cell will be automatically changed to the matching "Source Column Value" after the integration is triggered.
Tip: try filling in the same value horizontally. The "Key" field triggers the integration and the "Column" field will be changed automatically.
Activating the Configuration
To activate the configuration, go to your Target board.
Click on "Integrations" and find Sync Items and Boards.
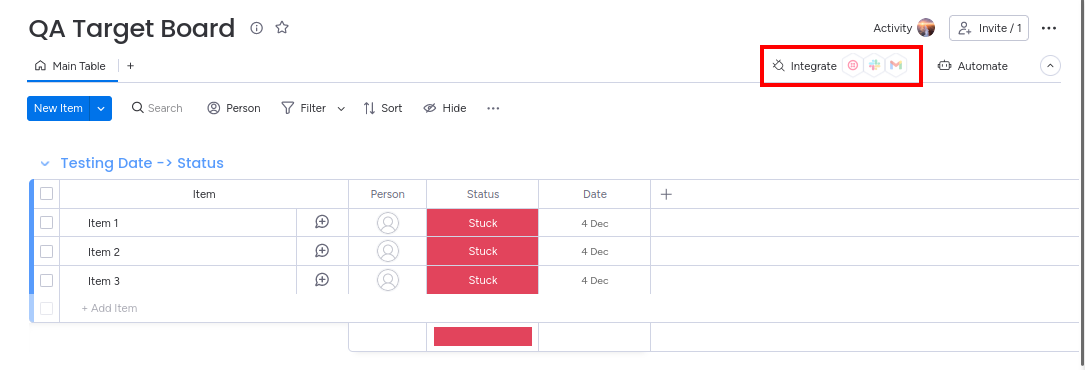
Select from the three available integrations the one that applies to your configuration. For example, if you selected "Date" for Source Key Value and Target Key Column, and "Status" for Source Column Value and Target Column Value, then select the integration "When the date changes, update the status on the linked board".

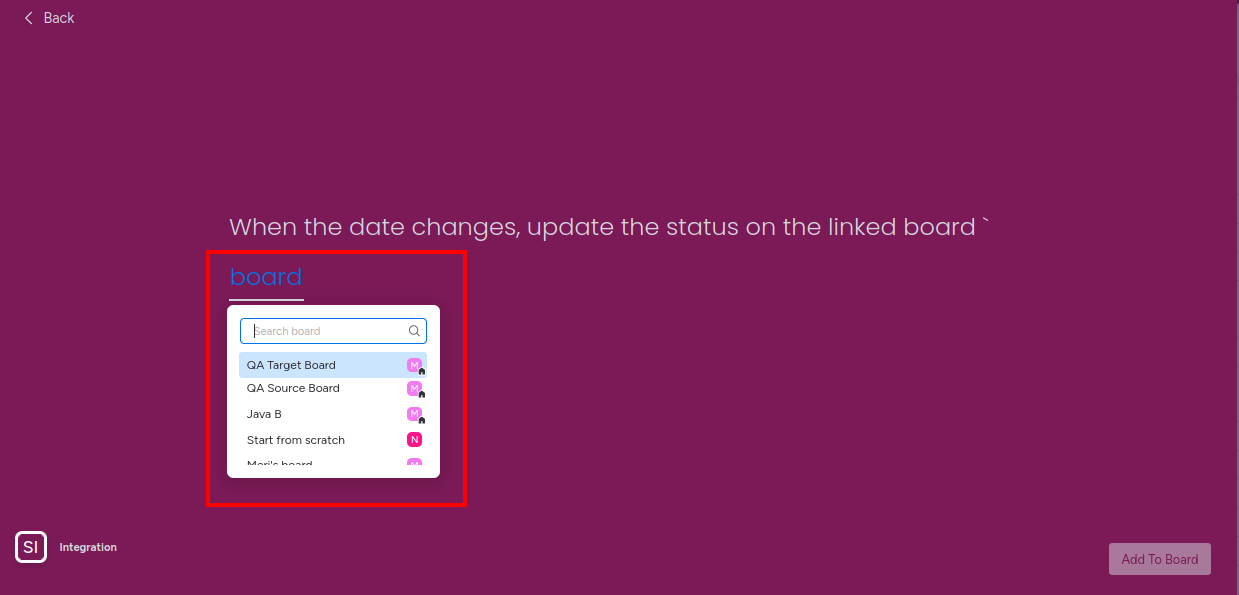
If the integration contains a clickable "board" text, it means you need to click on it and select your target board before addint it to the board:
Frequently Asked Questions
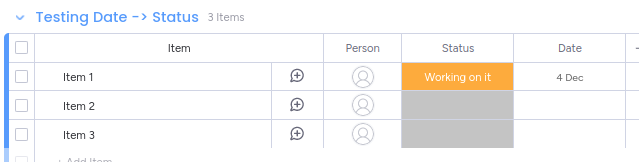
What happens if the integration finds two matches on the source board?
In this case, only the first match will be kept, from the top down. For example, this is the Source Board:
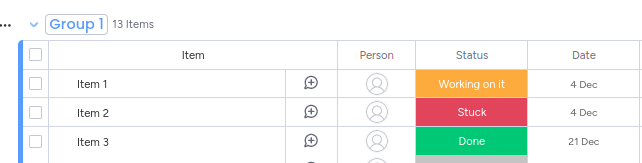
If you select "4 Dec" on the target board, the new status will be "Working on it" and not "Stuck".
What does it mean if I get an error message about an "infinite loop"?
Sometimes you will be unable to create a static configuration and the error message tells you it's because it would create an infinite loop. This means that you already have a configuration that changes certain items, and the new configuration would interfere with the previous one in a way that would create an infinite loop of changes.
To resolve this, please go to the "Static configurations" tab and remove the integration that is set up for the fields.
Release Notes
Figma Integration for Jira
The purpose of this Jira integration is to connect your Figma account your Jira account. After installing the app, you will be able to add Figma designs to your Jira issues. You will also be able to add comments that will appear on both platforms. This way you can effectively collaborate with your team on Figma designs.
Getting Started
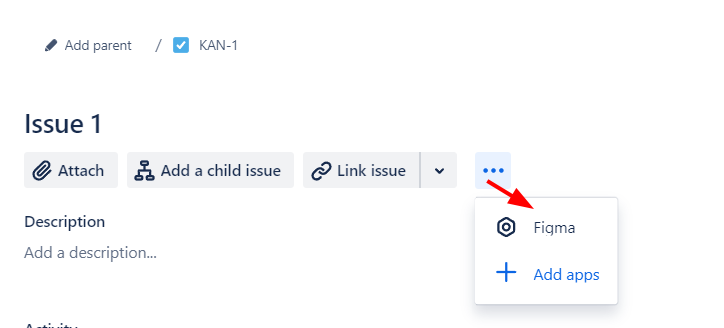
After installing the app, go to the issue where you want to attach the Figma design. If you don't already see the section, click on the three dots and choose "Figma".
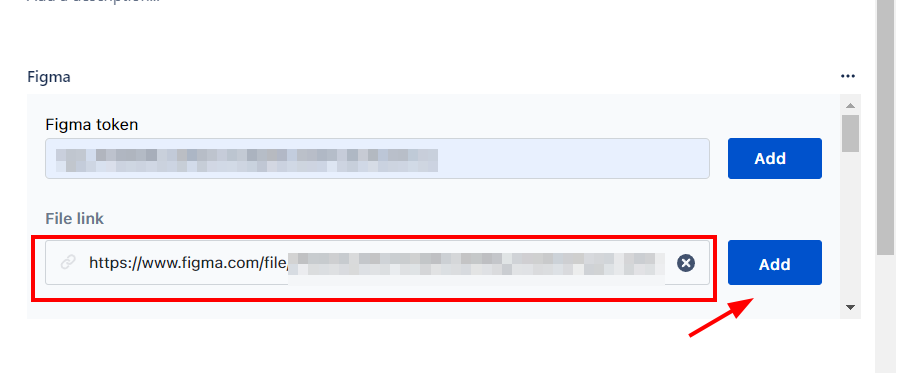
The first thing you need to do here is insert your Figma access token and click "Add".

You can create Figma access tokens in your Figma account under "Settings" - "Personal access tokens".
After adding the token, click on "Add Figma link" and copy-paste the link to the Figma design into the "File link" field. When you click on the "Add" button, your Figma design will be inserted into the issue.
Adding Comments
To add comments, use the "+Add a comment" button.
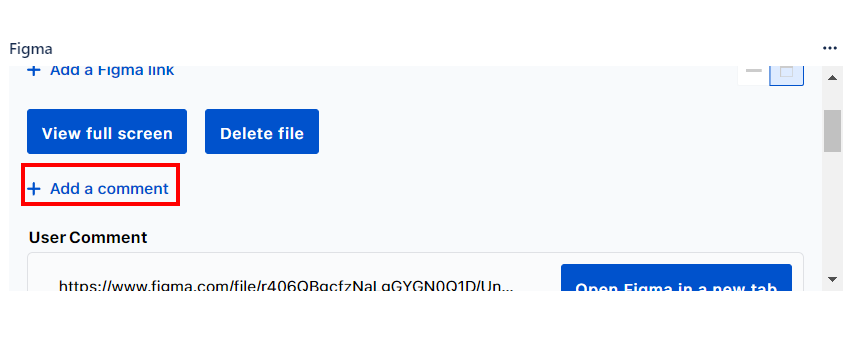
Type your comment into the field, then click on "Add".

To see your comment, refresh the page. The comment will also appear in Figma when you view the file.
Miro Integration for Jira
The purpose of this Jira integration is to connect your Miro account your Jira account. After installing the app, you will be able to add Mrio boards to your Jira issues. You will also be able to modify the board directly from the Jira issue. This way you can effectively collaborate with your team on Miro projects.
Getting Started
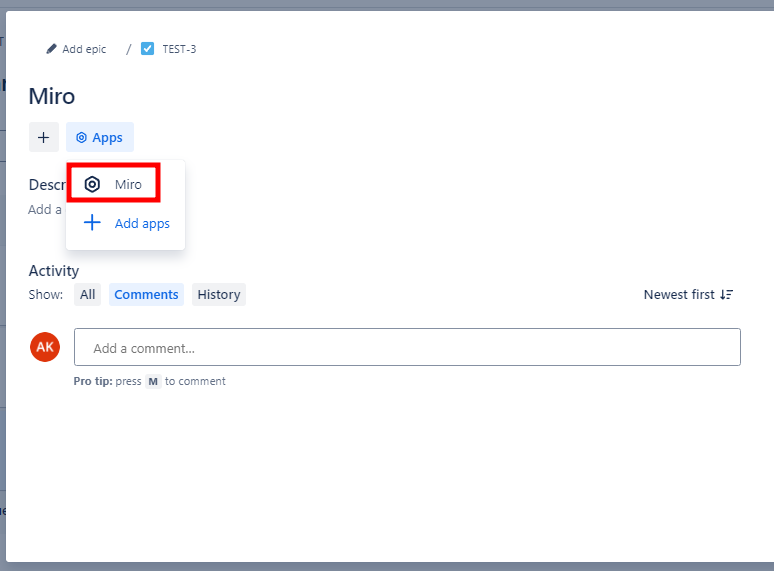
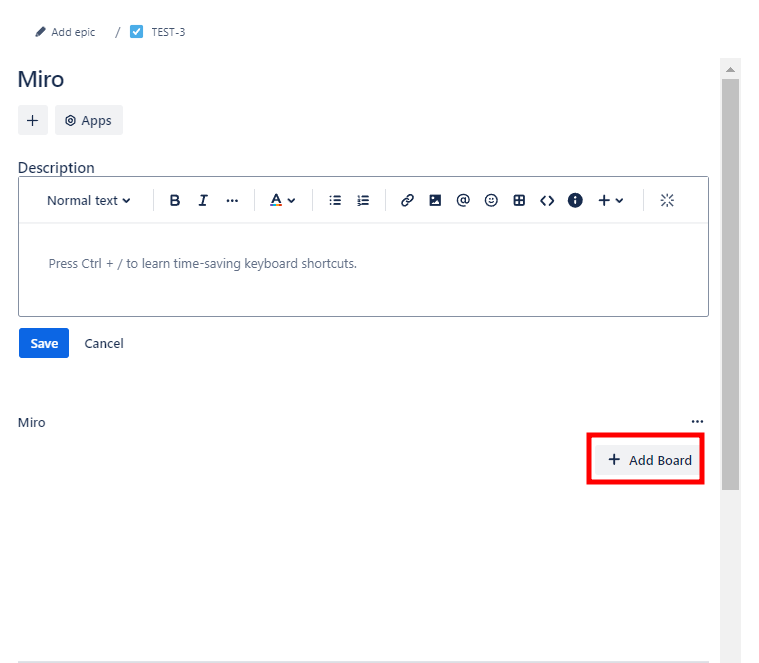
After installing the app, go to the issue where you want to attach the Mrio board. If you don't already see the section, click on the "Apps" option and choose "Miro".
Next, click on the "+Add Board" option.
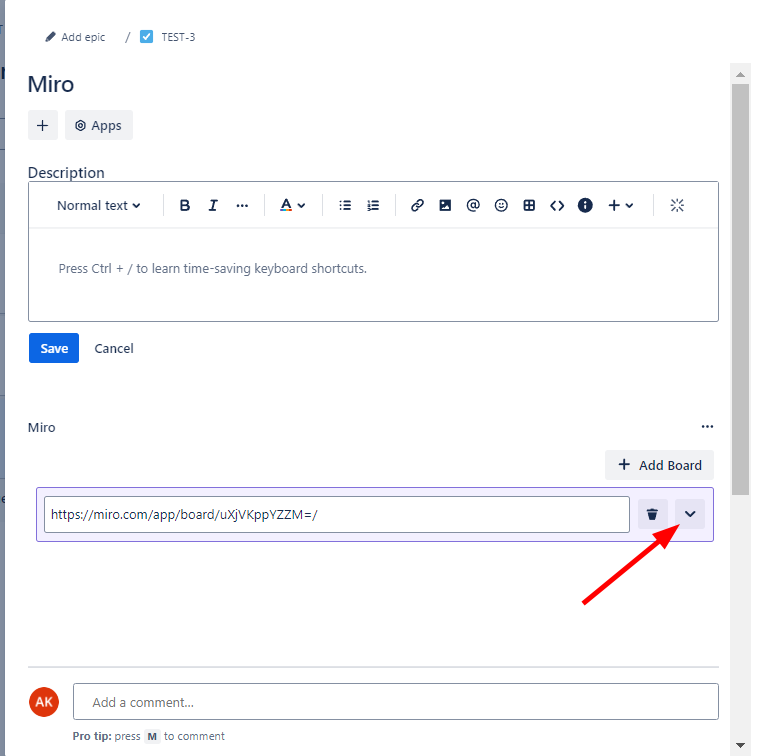
When the field appears, copy and paste the URL to your Miro board, then click on the checkmark.

You have successfully added your Miro board to the issue. To view it in the ticket, open the section with the arrow.
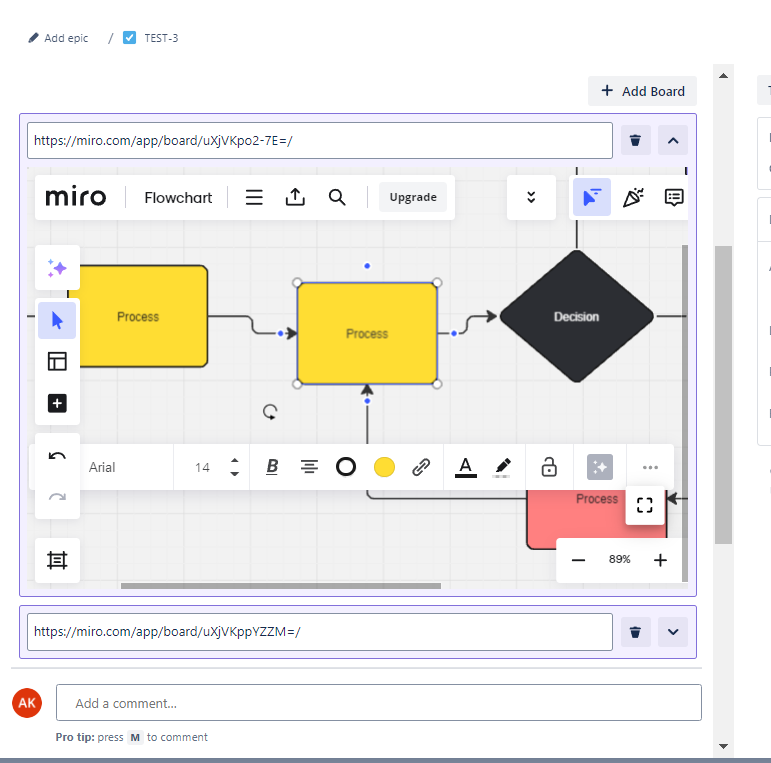
Here, you are able to view and modify the board just like you do in Miro.
Test Chapter
this is a chapter
New page in new chapter
new page content
Appvibe Documentation
Elevate Your Productivity with Leading B2B Solutions
Appvibe is at the forefront of B2B marketplace applications, providing innovative solutions designed to enhance productivity and streamline business operations. We are proud to be trusted partners of both Atlassian and Monday.com, delivering integrated solutions that drive efficiency and growth.
Why Choose Appvibe?
- Proven Expertise: With over a decade of experience in developing cloud-based applications, Appvibe has a strong track record of delivering reliable and impactful solutions to thousands of companies worldwide.
- Global Trust: Trusted by more than 2,000 businesses across various industries, our products and integrations are designed to meet diverse business needs with excellence.
Partnered with Leading Marketplaces
As an official and trusted partner of Atlassian and Monday.com, Appvibe ensures that our solutions integrate seamlessly with these platforms, offering enhanced functionality and an optimized user experience.
Our Solutions and Apps
We offer a comprehensive suite of solutions to boost your business efficiency, seamlessly integrating with popular platforms to enhance your workflows:
1. Design
Create intuitive and engaging designs for your applications.
- Canva Integration for monday.com: Use Canva’s design tools directly from within monday.com to create visually appealing content for your projects and tasks.
- Canva Integration for Jira: Use Canva’s design tools directly from within monday.com to create visually appealing content for your projects and tasks.
- Figma Integration for monday.com: Streamline your design process with Figma by integrating your design boards into monday.com for efficient collaboration and management.
- Figma for Jira: Integrate Figma design files directly into Jira issues for seamless collaboration between design and development teams, tracking progress and feedback efficiently.
- Miro Integration for Jira: Integrate Miro boards for enhanced visual planning within Jira, allowing teams to collaborate and visualize project ideas seamlessly.
2. Software Development
Custom solutions tailored to your unique needs.
- Test Management for monday.com: Efficiently manage your test cases, cycles, and reporting within monday.com, ensuring that your development process stays on track with quality assurance.
- Git Integration for monday.com: Connect your Git repositories to track commits, pull requests, and branches directly within monday.com, ensuring developers and teams stay aligned.
- GitHub Integration for monday.com: Manage your GitHub projects and track progress on monday.com boards for streamlined collaboration between development and non-technical teams.
- Bitbucket Integration for monday.com: Sync your Bitbucket repositories and monitor development tasks seamlessly on monday.com boards.
- GitLab Integration for monday.com: Connect GitLab projects to monday.com to track issues and manage workflows across development teams.
- Azure DevOps Integration for monday.com: Enhance project tracking and manage tasks in real-time by syncing your Azure DevOps with monday.com.
3. Productivity
Tools and features designed to drive efficiency and growth.
- Time Tracking for monday.com: Track time spent on tasks and projects directly within monday.com, helping teams monitor productivity and manage project timelines.
- Slack Integration for monday.com: Enhance team communication by integrating Slack with monday.com, allowing users to send updates and messages across both platforms.
- Slack Integration for Jira: Enhance team communication by integrating Slack with Jira, allowing users to send Project updates and messages to Slack.
- Google Sheets Integration for monday.com: Sync Google Sheets with monday.com boards to import and export data for better project tracking and real-time updates.
- Google Calendar Integration for monday.com: Sync your Google Calendar events with monday.com to keep your schedule and task management in sync, ensuring nothing falls through the cracks.
- Sync Items and Boards for monday.com: Keep your monday.com workspaces synchronized by syncing items and boards across different teams or departments.
- MS Teams Integration by Appvibe for Jira: Facilitate communication by integrating Microsoft Teams with Jira, enabling seamless updates and collaboration between project teams.
4. Marketing
Enhance your marketing strategies and outreach.
- HubSpot Integration for monday.com: Align your sales and marketing efforts with HubSpot CRM, ensuring seamless communication and real-time data updates between the two platforms.
- Google Forms Integration for monday.com: Integrate Google Form responses with your monday.com boards, automatically capturing leads or feedback to manage them within your marketing workflows.
- Google Slides Integration for monday.com: Manage Google Slides presentations and collaborate with your team directly from within monday.com, streamlining the creation and presentation process.
5. Analytics
Gain actionable insights and make data-driven decisions.
- Reports & Charts Integration for monday.com: Visualize data with reports and charts directly within monday.com to make informed decisions based on real-time insights.
- Reports & Chart by Appvibe - Dashboard Gadget for Jira: Analyze your Jira data using Appvibe's dashboard gadgets, providing custom reports and visual insights to enhance your project tracking
Quick Links
- Products
- Support
- Security and Trust
- Contact Us
- Request a Demo
- Customers
- Privacy & Policy
- Terms of Service
- Service Level Agreement
- FAQ
Slack Integration for Jira
The Slack integration for Jira provides communication between your Jira workspace and Slack. Any change or update within Jira can be configured to notify one or multiple Slack channels. The Slack Jira Integration app allows you to connect these two services and make your distributed work environment more productive, effective, and rewarding.
Easy and Quick App Setup
These straightforward actions will deliver the add-on to your Jira instance just in a few clicks.
Setting up the Slack Integration
After installing the app, you can access the Configurations page by selecting the Slack Integration from the Apps menu.
To use the app, you first need to connect a Slack workspace.
- Click on "Add workspace"
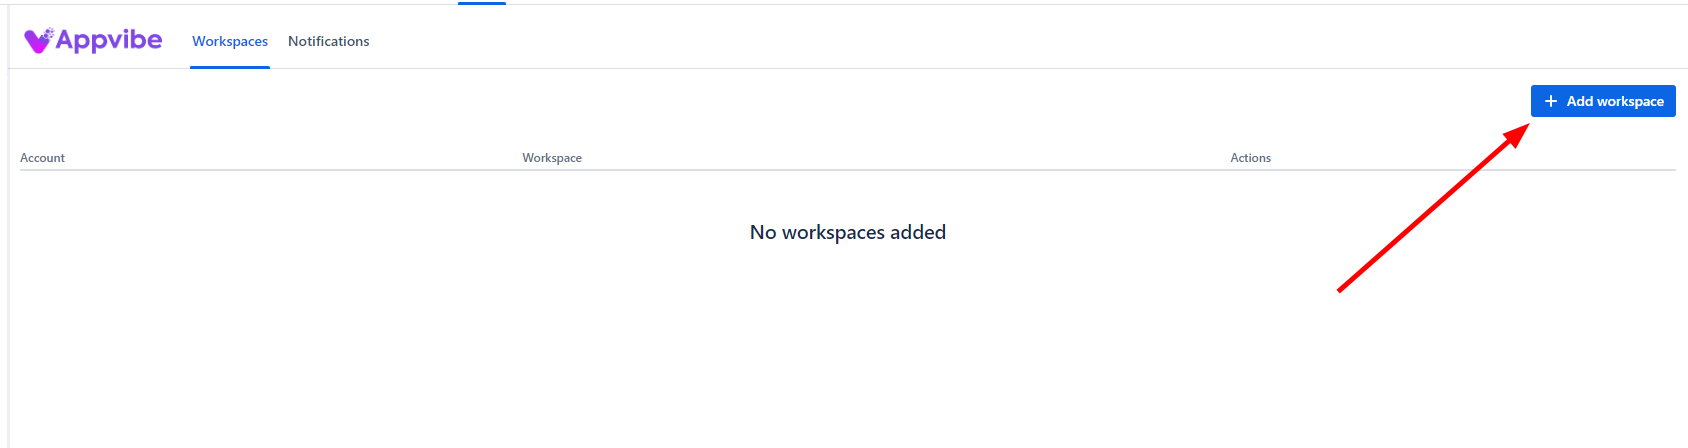
2. Follow the instructions on the pop-up window. Make sure to select the workspace you want on the top right, then click "Allow".
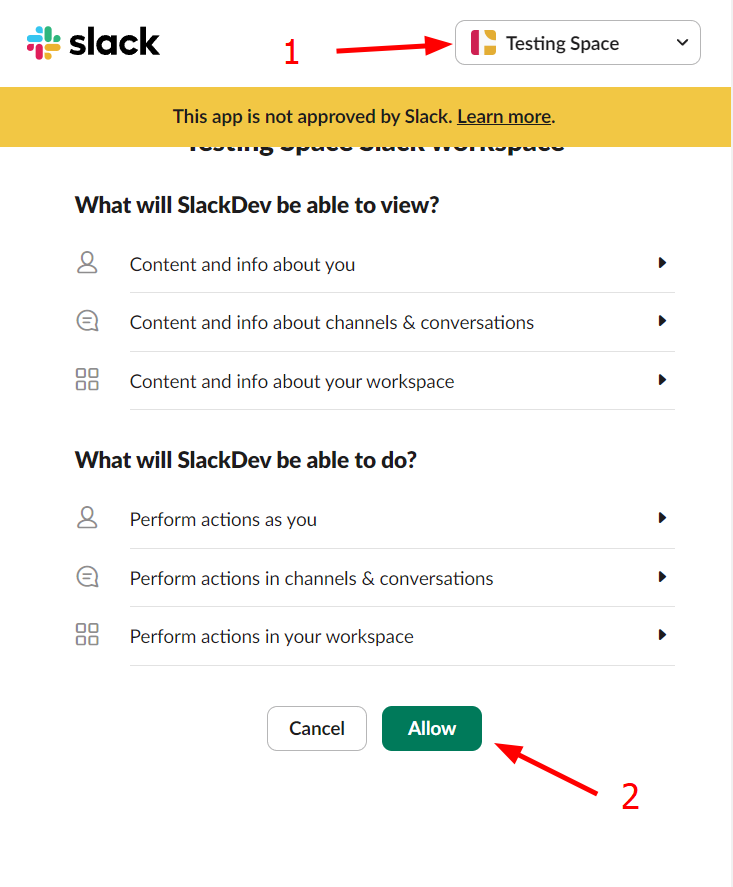
3. Your workspace is now connected and you can start using the app.
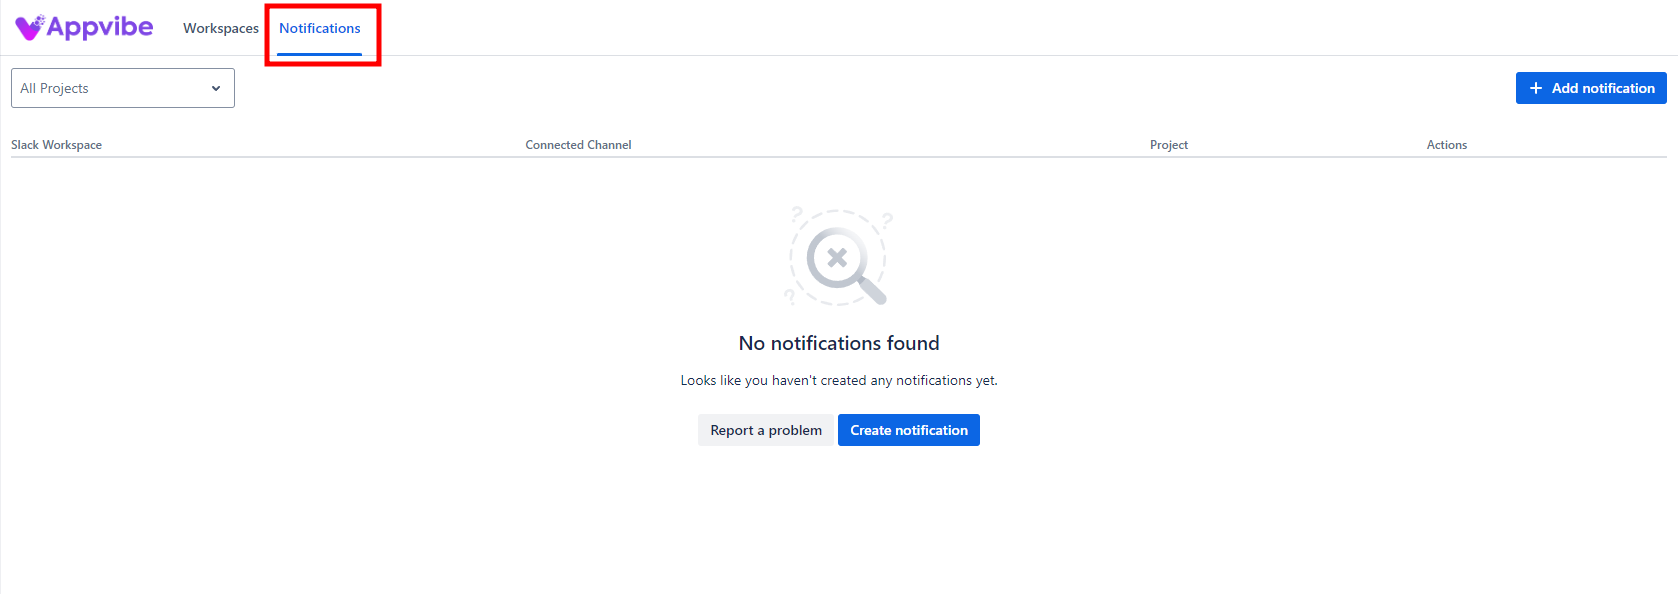
Setting up notifications
-
To set up notifications, go to the "Notifications" tab on the Configuration page.

- Click on the button to add a notification.
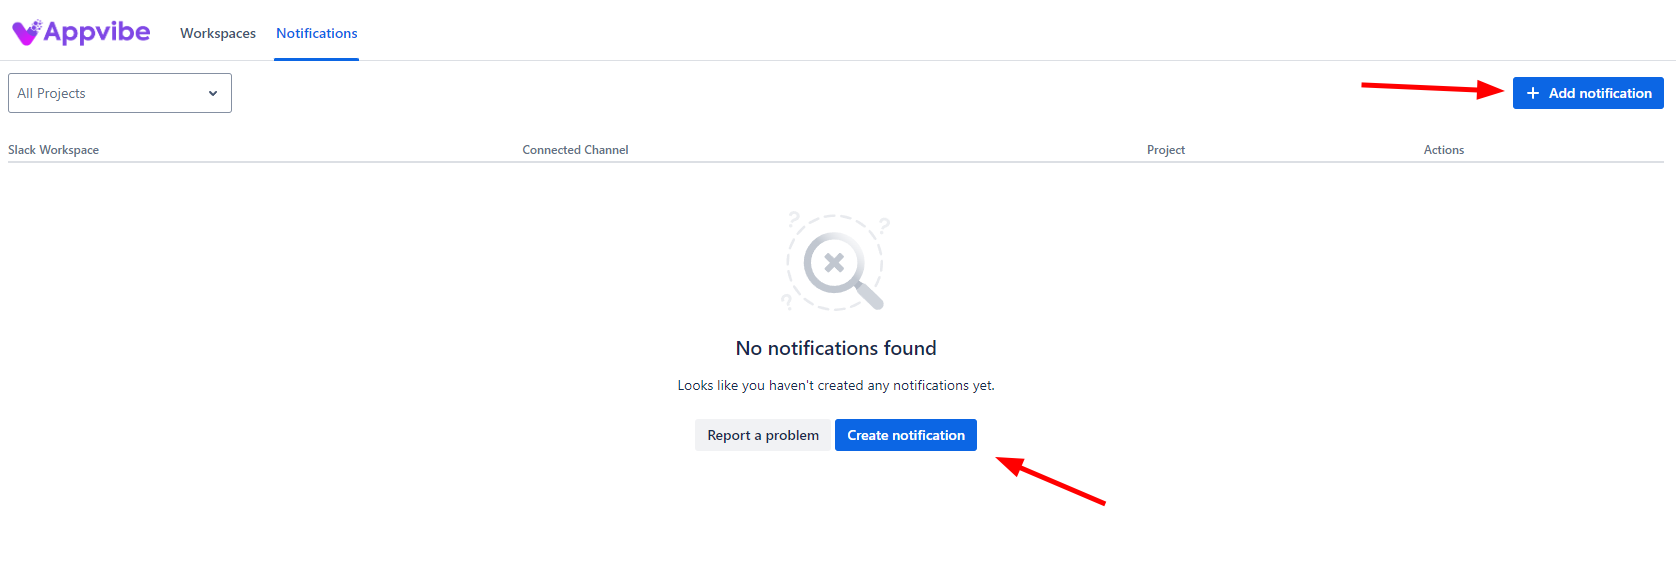
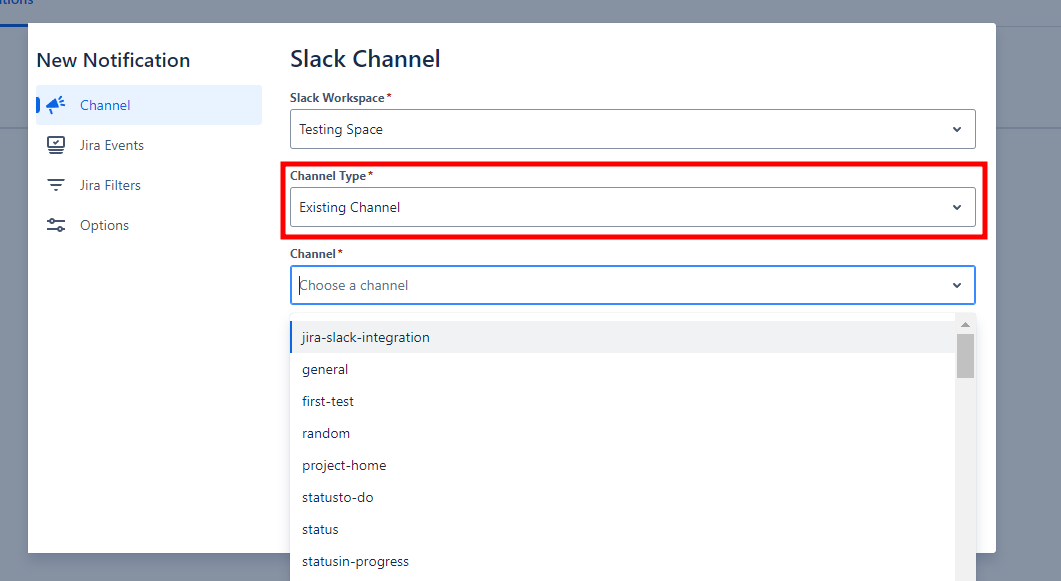
3. To set up a simple notification, you just have to fill out the three mandatory fields:
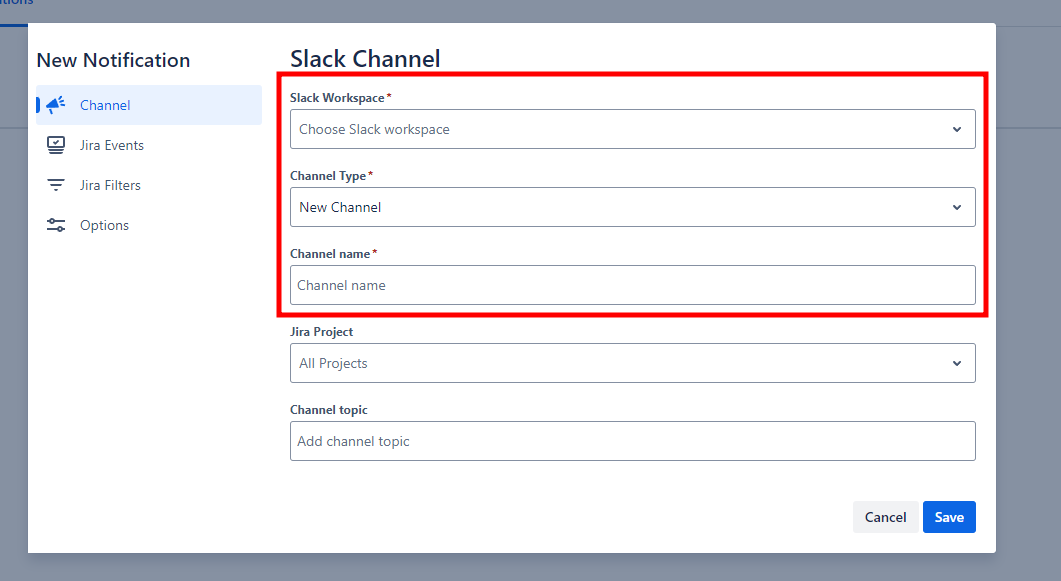
Slack Workspace: Select one of your connected workspaces from the dropdown.

Channel Type: Choose if you want to use an already existing channel or a new one.
- If you choose Existing Channel, the third field will be a dropdown containing your channel names from the selected workspace:

- If you select New Channel, the third field will be a textbox allowing you to name the new channel:

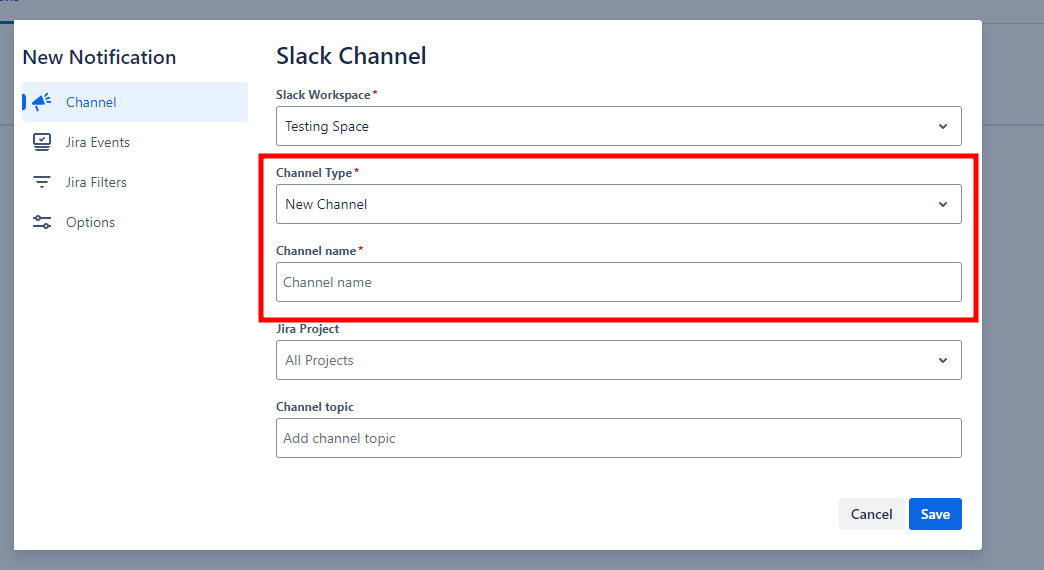
4. Click on Save to finalize the settings.
You will now receive all notifications to the selected channel.
Customizing your notifications
You can customize what types of notifications you see in Slack.
Jira Events
Our App allows you to customize notifications to reduce noise and ensure that users only receive relevant updates. You can filter Jira events—such as issue creation, status changes, or comments—based on your team’s needs by selcting the Jira Events tab. Shown below is how you can fine-tune your notifications:

Jira Filters
The Jira Filters tab allows users to fine-tune their notifications by applying advanced JQL (Jira Query Language) filters. This feature gives greater control over what notifications you receive by ensuring they are relevant to the specific issues, statuses, or actions you care about. An example filter is shown in the screen below.

Canva Integration for Jira
User Documentation: Canva Integration for Jira App
This guide explains how to use the Canva Integration for Jira app. It helps you manage Canva design links directly within Jira issues. With this app, you can add, edit, delete, and embed Canva designs effortlessly, providing easy access to relevant designs without leaving Jira.
Overview of Features
- List saved Canva links within Jira issues.
- Add or edit links with an inline form.
- Delete links with a confirmation popup.
- View Canva designs embedded directly in Jira using an iframe.
- Store links per issue with the Custom Entity Store for persistent data.
How to Use the Canva Integration App
1. Open the Canva Integration Panel
Click the "Canva Integration" button in the toolbar of a Jira issue (see image below). This opens the Canva section where you can manage your links.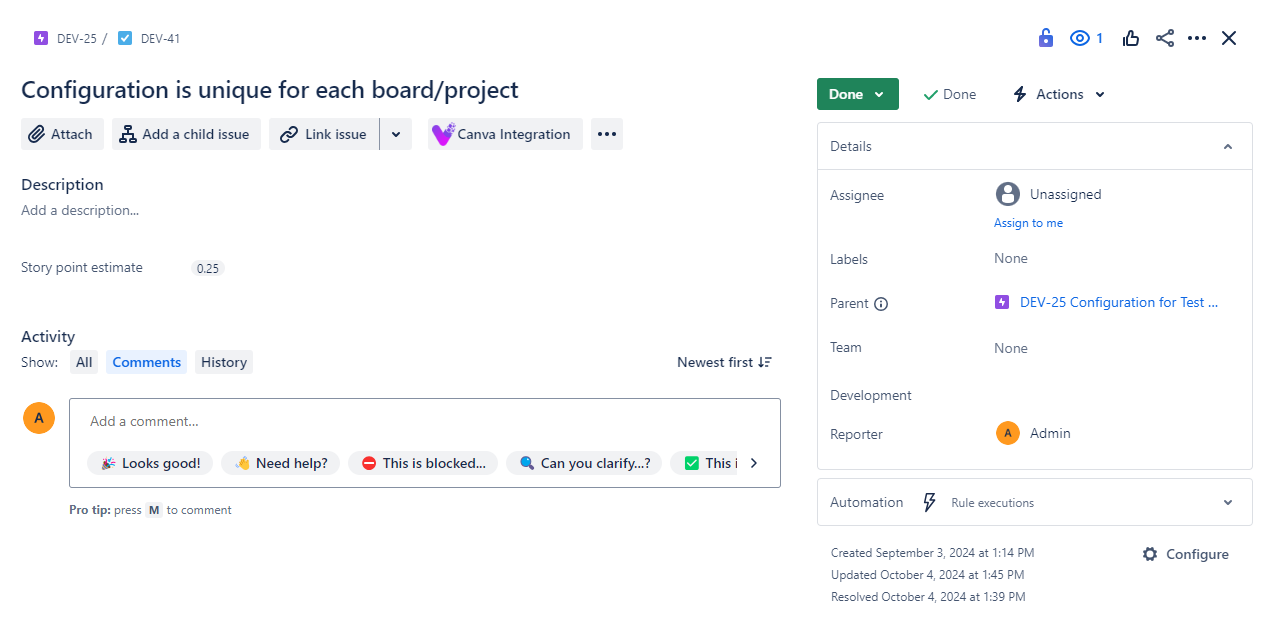
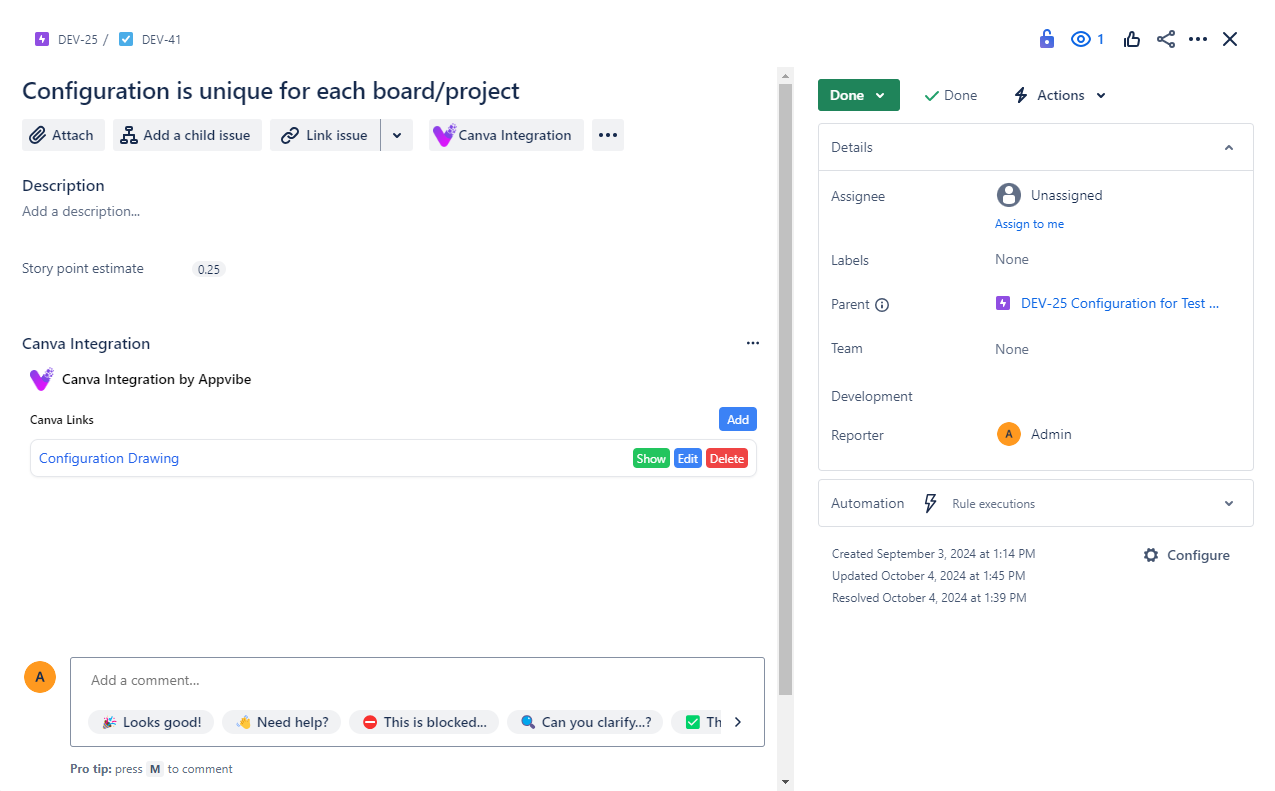
2. View Saved Canva Links
In the Canva Links section (See image below), you’ll see all saved links related to the current issue and be able to add a Canva embeded image.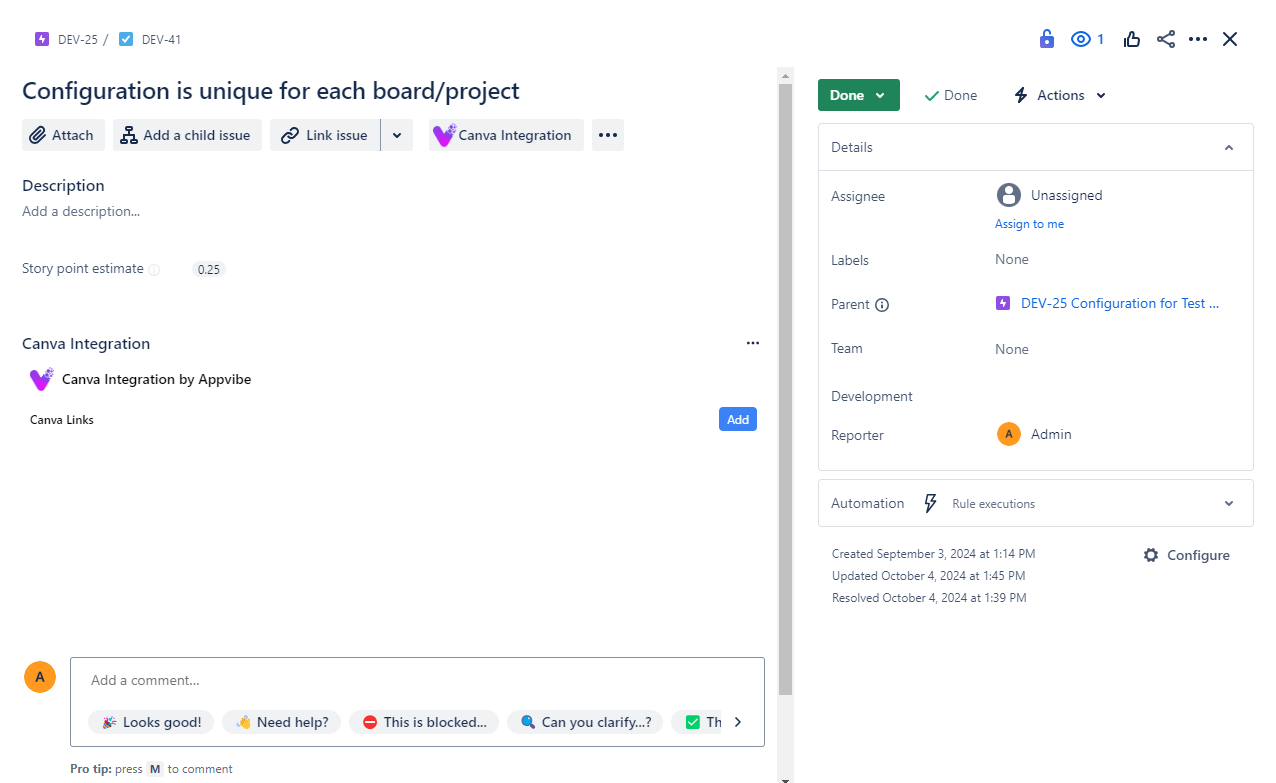
3. Add a New Canva Link
Click the "Add" button (See image below). A form will appear inline, allowing you to enter:
- Canva Design Embedded URL – The link to your Canva design.
- Titel – A meaningful name for the design. (optional)
| NOTE: It is important to get the link in the right link. You will need a Canva smart embeded link. To do this, navigate to your Canva desgin, then go to Share > More > Embed > Smart embed link. Click on "Copy". |
Once the details are entered, click Add.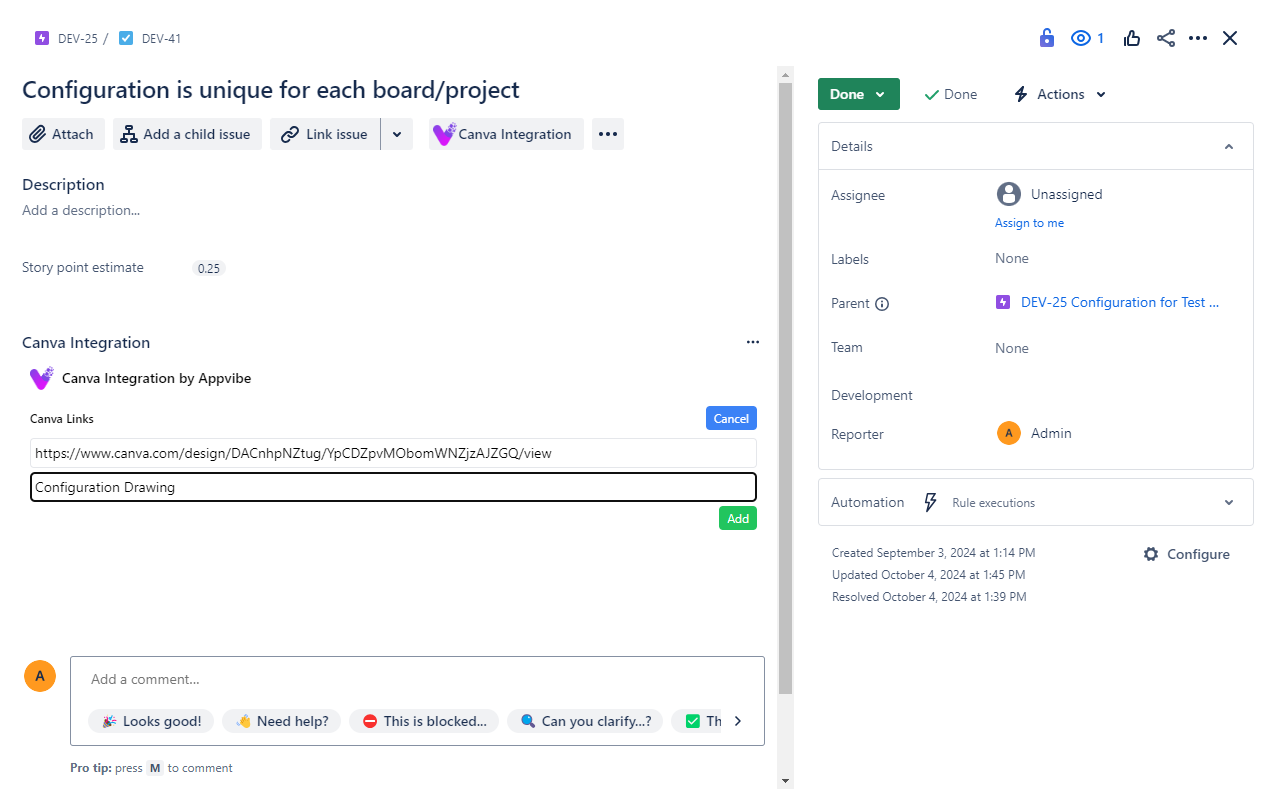
4. Edit or Remove a Canva Link
Each saved link (Image 4) has options to Edit or Remove:
- Show: Opens an inline form showing the Canva image.
- Edit: Opens the inline form for modifications.
- Delete: Triggers a confirmation popup for deletion.
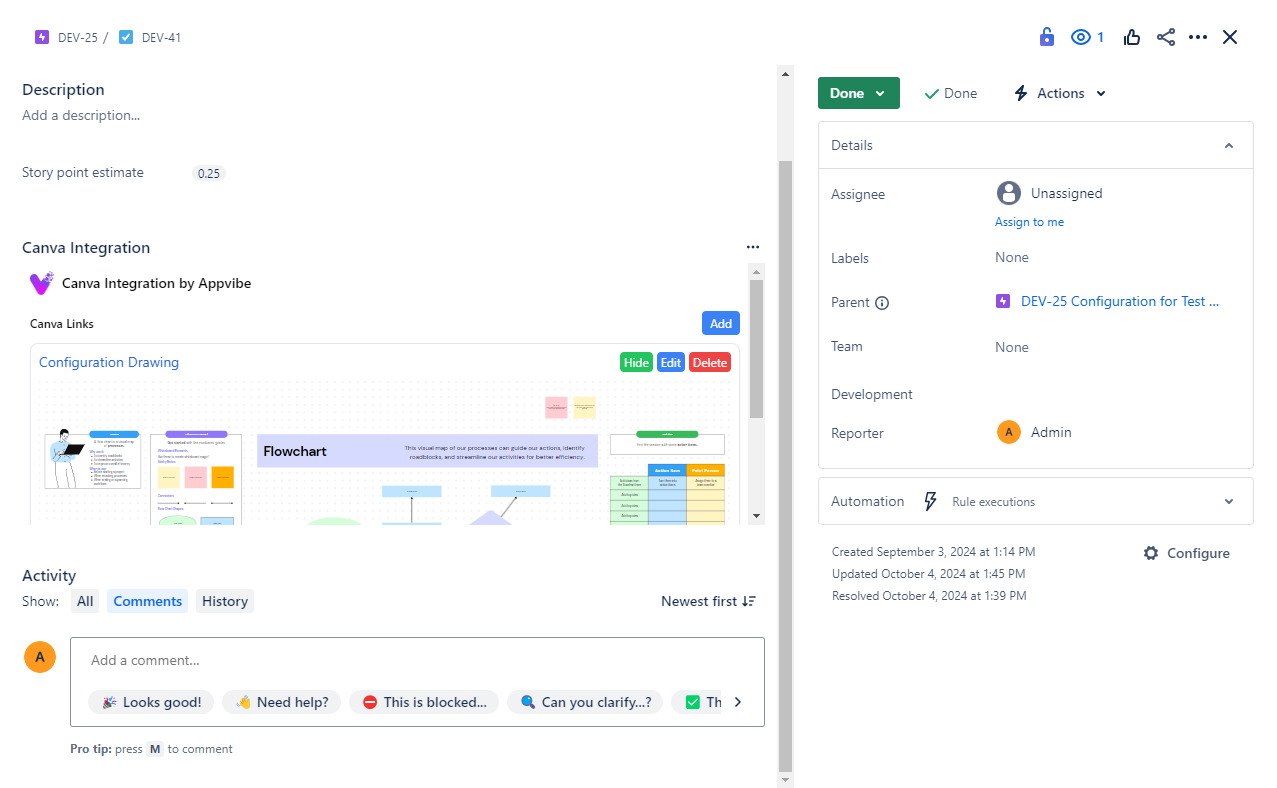
5. View Canva Design Embedded in Jira
Click on the Show link to see the Canva design in an iframe directly inside the Jira issue (See image below).
FAQ
-
What if the Canva link doesn’t load?
Ensure the link is public and accessible. If Canva blocks embedding, try opening it in a new tab. -
Can I add multiple links to one issue?
Yes, you can add multiple Canva links to each Jira issue. -
How secure are my Canva links?
All links are stored within Jira’s Custom Entity Store and are scoped to each issue, ensuring privacy and security.
Conclusion
The Canva Integration for Jira app makes it easy to manage and access Canva designs within Jira. With seamless embedding, your team stays focused on tasks without switching between tools.
If you need further assistance, contact your Jira administrator or